An easy moist cake, perfectly caramelized slices of pineapple, and a hint of cinnamon make this the best Pineapple Upside-Down Cake we have ever had. This is a classic worth making again and again.
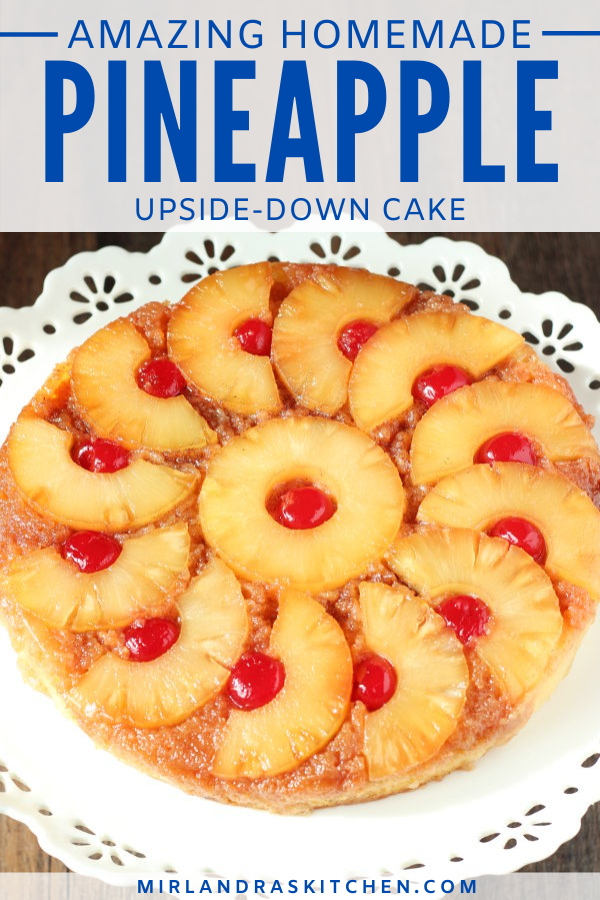
Easy Pineapple Upside Down Cake With Lots of Pineapple (The BEST Recipe)
My father completely adored pineapple upside-down cake. His one complaint was that nobody put enough pineapple in it! Over the years I saw him bake them different ways until finally he just started putting crushed pineapple in the bottom. He said that way you got some with every bite!
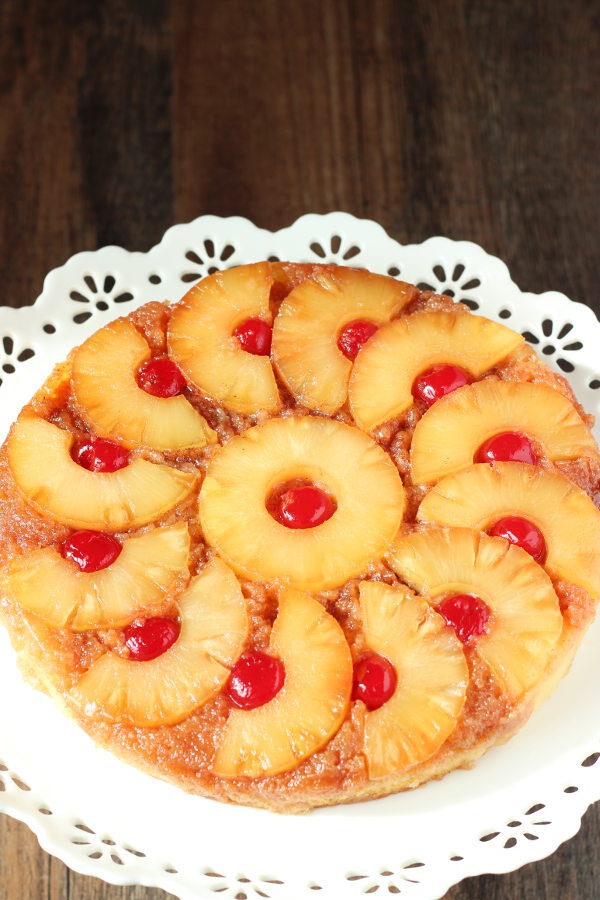
While Dad’s method was effective, I didn’t think it was very pretty. Half the fun of pineapple upside down cake is how pretty it looks when you flip it out of the pan! I have finally solved the problem to my satisfaction by slicing each ring of pineapple in half. Now the cake is beautiful and there is lots of pineapple!
The History of Pineapple Upside Down Cake
Pineapple Upside Down Cake first showed up in the 1920s with the widespread availability of canned pineapple. It was unusual to be able to find fresh pineapple and if you could it would be horribly expensive for the average household. However, canned pineapple was a reasonable price and had become widely available.
Jim Dole (Dole Food Co.) expanded pineapple production in his company and canned about 95% of it which brought canned pineapple to the average home cook.
By 1926 Dole Food Co. had a contest for “cooking-with-pineapple” recipes and Pineapple Upside Down Cake was such a popular recipe that Dole got 2,500 recipes for the cake submitted!
Almost 100 years later we are still making Pineapple Upside Down Cake and still usually using canned pineapple to make it! You can use fresh pineapple instead if you prefer. I suggest using a small biscuit cutter or doughnut hole cutter to cut out the core and make rings out of pineapple slices before layering them into the brown sugar.
How to Make Pineapple Upside Down Cake
Pineapple Upside down cake always LOOKS like hard work but thankfully it is a nice, easy dessert ready in just a few steps:
- Pour melted butter in the pan and sprinkle brown sugar over it.
- Put the pineapple and cherries into the sugar.
- Stir together a simple but rich cake batter and pour over the top!
Bake and serve – easy as cake! (Yeah, I know the saying is easy as pie but it could be easy as cake if all cakes turned out as well as this one does!)
I like to serve this cake with a scoop of vanilla ice cream or a big dollop of my homemade whipped cream to cut the sweetness of the cake with a nice creamy addition. But it is perfectly good just by itself!
Pineapple Upside Down Cake Pan
A pineapple upside down cake needs a spring form cake pan. A standard cake pan without removable sides makes it almost impossible to remove the cake without it breaking. Also, standard cake pans are just not tall enough for this recipe. There are plenty of times where one pan can be used for another but this recipe is not one of them.
A word of wisdom as you pick out your pan – NOT all spring form pans are created equal! All over the internet people are lamenting about leaking pans! I think I have heard it all and seen it all on various other pineapple upside down cake recipes!
A spring form pan is just like any other cake pan. You get what you pay for! So if you buy a shoddy pan it will leak and you will have a big mess in your oven and it will be frustrating. If you buy a good quality pan it won’t leak and your cake baking experience will be wonderful! Remember you can also use your spring form pan for cheesecakes, torts and ice cream cakes!
I recommend picking up a good quality Cephalon Spring Form pan. They make nice solid bakeware at a reasonable price.
More Pineapple Recipes to Try

Pineapple Upside-Down Cake
Ingredients
For the Pineapple Fruit Layer
- 1/2 cup salted butter
- 3/4 cup light brown sugar packed
- 1 can pineapple slices 20oz size
- 13 maraschino cherries
- ½ teaspoon cinnamon
For the Cake Batter
- 1 cup all-purpose flour
- 3/4 cup granulated white sugar
- 2 teaspoons baking powder
- 1/8 teaspoon salt
- 1 large egg
- 1/2 cup buttermilk
- 1/3 cup sour cream
- 3 Tablespoons vegetable oil
- 1 Tablespoon pure vanilla extract
Instructions
- Please see note about spring form pan before beginning.
To Make The Pineapple Fruit Layer
- Adjust an oven rack to the middle of the oven. Preheat oven to 350F.
- In a small bowl, melt the butter in the microwave.
- Pour the butter into a 9-inch springform cake pan (a regular 9” cake pan does not have tall enough sides.) Rub a bit of the melted butter up the sides of the pan to grease them.
- Scatter the brown sugar evenly over the butter.
- Arrange the pineapple rings and cherries in the pan: Start with 1 whole slice of pineapple in the center of the pan. Cut the rest of the rings in half and arrange 12 halves in a circle around the original pineapple ring. If you have additional haves left you can eat them or tuck them into the sides of the pan after you pour the batter in.
- Place a cherry in the center of the whole ring of pineapple and in the center of each half rings of pineapple. (See recipe photo for reference.)
- Sprinkle the cinnamon over the fruit.
To Make The Cake Batter
- In a large bowl, whisk together flour, sugar, baking powder, and salt. Set aside.
- In a medium bowl whisk together the egg, buttermilk, sour cream, oil and vanilla.
- Add the wet mixture to the dry, folding with a spatula until just the mixtures are combined. Do not overmix, it is ok to leave some small lumps in the batter.
- Scrape the batter into the pan over the fruit. Be careful not to mess up your arrangement.
- If you want, tuck the extra half pineapple rings into the sides of the pan. Place the round side down a few inches apart. This gets just a bit more pineapple in the cake and makes the sides quite pretty.
- Bake for 38-40 minutes. The cake is done when the center is set and a toothpick inserted 1” into the center of the cake comes out with a few moist crumbs but no batter.
- Place the pan on a wire rack to cool and set up for at least 30 minutes and up to overnight. If you plan to leave it overnight place a sheet of foil loosely over the top to keep the moisture in.
- Run a thin spatula along the edges of the cake pan to make sure the cake is loose from the sides. Carefully invert it onto a serving platter and serve. This cake is good by itself or paired with a dollop of whipped cream or a scoop of vanilla ice cream. Store leftovers at room temperature for up to 3 days.
Helpful Recipe Notes
Your Rating Matters
When you leave a comment or star rating, it means more than you might think. It helps me understand what you’re enjoying, builds trust for other readers, and supports real, tested cooking content. If you have a moment, I’d truly appreciate you sharing your experience. - Mirlandra
Nutrition Estimate
A Note on Nutrition
Nutritional info is an imperfect estimate. Please take it with a grain of salt.
I read each and every comment and I try to respond to questions asap, so ask away! If you’ve made a recipe, I would love to hear about it! Please come back and share your experience and give the recipe a 5-star rating so other people will know how much you loved it!
PIN FOR LATER
Recipe adapted from The Joy of Cooking.
This recipe was originally published in March of 2017. It was updated in March of 2021 with additional information.
Gentle Joy Homemaker says
Your cake looks wonderful… and I do like the idea of cutting the pineapple in half as you have done… not only do you get more pineapple in each bite, but it looks nicer too. Im so sorry about the loss of your dad.
Mirlandra says
Thank you for your kind words. I will always miss him but time eases the hurts and I have many wonderful memories to treasure.
Barbara says
I’m gonna try your dads cake. Thank you for sharing.
Mirlandra says
Enjoy!
Sarah says
Miranda:
Thank you for sharing this recipe! I am going to make it on Saturday where it will be enjoyed at a Celebration of my Dad’s life. He passed away in late 2016 and I miss him terribly. He also LOVED pineapple AND CAKE so I know he will be looking down fondly upon us as we celebrate how he much touched our lives. May you and I both have wonderful memories of our great Dads forever!
Mirlandra says
Oh Sara – I’m so sorry about the loss of your father. I know how difficult this moment is. We are coming up on the one year anniversary of loosing my father and while time has eased his passing I do miss him very much. I am so glad you get to share this cake at his Celebration of Life. He must have been very lucky to have you. Thank you so much for sharing- you touched my heart!
Kim says
Was it supposed to rise up high? Mine did not and turned pretty dense.
Mirlandra says
It is not supposed to be very high. It should be a more heavy cake like a pound cake with a nice dense chew. I hope that helps clarify!
Evie says
Hi! I just made this cake and it’s in the oven as we speak. I ran into a problem with the springform….the melted butter leaked out quite a bit. I don’t know why, since it was closed correctly. I placed a cookie sheet under the springform in the oven and it’s been leaking out still. Has anyone ever run into this problem? I am afraid my cake will stick and it won’t turn out right 🙁
Mirlandra says
Hi Evie,
I’m sorry that happened! I’ve not run into it with my pan but mine is only a few years old and shuts quite tightly. I wonder if your pan does not have a very tight closure? Can I ask what brand our pan is if you know? I’m always on the look out for cooking equipment to avoid or to love 🙂 How did the cake turn out?
Charlene North says
My springform pan let the butter drip out the bottom. Now I have to clean my oven floor.
Mirlandra says
Hi Charlene – I’m sorry that was your experience. Not all pans are the same quality. I use a washable oven liner like this one (https://amzn.to/2UB7Mlo) so that I don’t have to deal with clean ups when I get surprised! I hope the rest of your holiday baking goes better and you don’t have any more oven messes to contend with!
Delana says
ABSOLUTELY amazing! This was a hit!
Very impressed! I always make the batter from
Scratch… not anymore! Thank you!
Mirlandra says
Hi Delana – So glad you enjoyed the cake! Cook on!
Lorraine D says
I just made this and it is now cooling. I had the same problem with a bit of oozing of the melted butter as well. I am using a Wilton Springform Pan. I was actually looking for Cephalon, but trusted Wilton. Now I know.. but it looks amazing and can’t wait til cooling is complete!!
Mirlandra says
Hey Lorraine! I’m sorry about the oozing. That is so frustrating! One of the things I’ve noticed in the last 10 years is brands I used to trust making stuff that isn’t as good as I was used to. Wilton is one of the brands that I feel is a lot more hit and miss now than it used to be. I hope you are able to figure out a good pan in the long run! Enjoy that cake 🙂
Teresa says
I’m getting ready to make this; and I know my springform pan leaks! So I’ve always lined the bottom with parchment paper, then put the ring on (over parchment), seals it nice and tight. But I’m worried it won’t caramelize with parchment paper? Before I discovered that trick, I would put foil tightly around outside of pan, which contained it, kept my oven clean, but still would leak out into foil
Mirlandra says
Well I’m kind of a kitchen rebel so I would try it! I think it is more likely that it would work than not because the caramelization is happening because of the heat. BUT that being said I haven’t tried it so I can’t promise you! My general kitchen philosophy is that taking some chances means you learn a lot and find stuff you love so I almost always suggest people take chances on recipes and enjoy the adventure of it. Best of luck!
Debbie says
Thinking of using small individual serving springform pans. I assume it would work but not sure of the bake time?
Thanks for any advice you can offer.
Mirlandra says
Wow! It sounds super cute but I have no idea what to tell you on timing. Obviously it is going to be a lot less time but how much less is the question… You might see if you can find a recipe for individual springform pan cakes and see what other people suggest. Otherwise you can assume it will take at least as long as cupcakes and keep a close eye on it from there. Good luck and happy baking!
Meaghan Curley says
I’m excited to make this but I don’t have buttercream. How important is it?
Mirlandra says
Hi Meaghan – This recipe doesn’t call for buttercream. Is it possible you are asking about a different ingredient or maybe a different recipe?
Suz Quinn says
I won’t be making this cake until later in the week, but I thought I would look up a springform recipe. You say to cool for 30 minutes or overnight? I was going to let it sit for 5-15 and then remove the sides and then the top. This will be a make-the-night-before cake.
Mirlandra says
Giving it a little time to cool before you start pulling it off the pan really helps. Keep in mind the topping has melted butter in it and if you get too wild too fast things can get messy. I hope that helps!
Gail Waldo says
Leak-proofing is easy. Place the pan on heavy duty aluminum foil. Wrap up the sides and secure with a fold on top. I tested it with 1/2 cup of water and it held tight! The recipe and design are amazing!
Mirlandra says
I’m so glad this is a good method for you! And thank you for your kind words 🙂