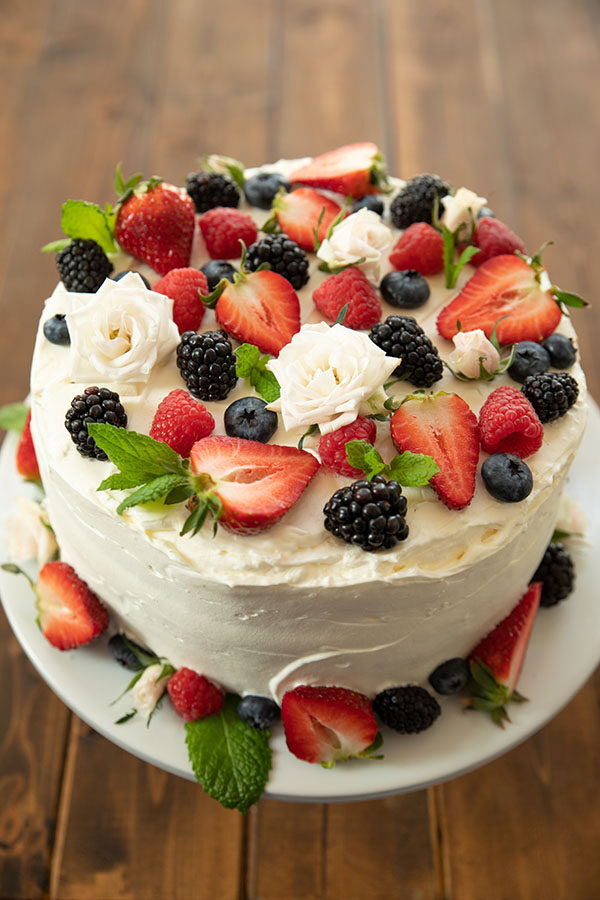
Berry Chantilly Cake has officially taken my heart! The beautiful layers, the simple flavors of perfect whipped cream, raspberries, blueberries, hint of jam and tender yellow cake make something magic. This version uses a yellow cake mix with some extra ingredients (like a cup of butter!) to keep life simple.
A few weeks ago I saw a picture of a Berry Chantilly Cake and I was completely captivated. It was like all my springtime berry and cream dreams on a platter!
I couldn’t stop thinking about the cake so I did a bunch of research on the recipe. We recipe writers are kind of geeky – but enjoy it! If you are here reading you know how awesome we are 😉
And then berries went on sale and next thing you know I’m in my kitchen with a half a gallon of 40% heavy whipping cream and I’m going for it!
Easy Berry Chantilly Cake
This cake is just amazing… It got RAVING reviews (and dare I say some moans) from multiple testers.
Who could blame them? The tender layers of cake, the fluffy whipped cream, the bursts of berries – I already know it will be one of my favorite recipes of 2020. I never make that call so early in the year!
I’m planning on taking it to Easter Dinner, making it when my Mom visits, and probably serving it on my birthday!
Most recipes call for a scratch made cake. I love cakes from scratch but I wanted something EASY and simpler.
This is a recipe for people who want to do a creative, beautiful cooking project but don’t have three hours / cake flour / mad skills in the baking department.
Slaying With a Yellow Cake Mix Recipe
Berry Chantilly Cake should have a moist, tender, flavorful cake. And you CAN get it with a cake mix! There are a few simple steps to getting a yellow cake mix to taste like you slaved over it!
- Start with a high quality mix. Like any cake, the ingredients determine a big part of the outcome. I only use Betty Crocker – they are dependably high quality. If you use something else and don’t like the results I don’t wanna hear about it!
- BUTTER! Yep – ditch the oil – we use 1 cup of butter here instead of 1/2 cup of oil. And you can TASTE it in the results!
- Some extra egg. In my tests adding a whole extra egg made the cake too “eggy.” Instead just add one extra white. You don’t even have to beat it – just toss it in there with the other eggs. This gives the batter a bit of lightness without any extra fuss!
- Milk instead of water – yep, dairy for the win! This gives the cake a more rich flavor!
- Add real vanilla! No cake mix has enough high quality vanilla in it so we amp that up !
Think of a yellow cake mix as a simple starting base for a killer semi-homemade cake. A few extra ingredients and the magic is yours.
This is a cake you could taste side by side with a high end bakery cake and find this one a winner!
(If you are looking for a recipe to modify chocolate cake mix I have one here!

Whole Foods Chantilly Cake
The store Whole Foods claims credit for coming up with the recipe for Berry Chantilly Cake. So I drove 30 minutes to my nearest Whole Foods to try the original!
It tastes nice. But I now have a $6 slice of cake with three bites out of it rotting in my fridge while we eat slice, after slice, after slice of the homemade version.
Sorry Whole Foods – my recipe for Berry Chantilly Cake leaves yours in the dust! (And it sure costs less!)
What is a Chantilly Cake?
A Chantilly Cake is one made with Chantilly Cream (crème Chantilly in French). This is simply a sweetened whipped cream that originated in the small town of Chantilly, France.
Traditionally this whipped cream frosting was flavored with vanilla or brandy but for this recipe I’m using a touch of almond extract to bring out the flavor of the vanilla cake and the berries.
Can we all take a moment to be thankful for the French and their passion for all things delicious!
Using Stabilized Whipped Cream in Chantilly Cake
The process of stabilizing whipped cream is just using a method to help the fluffy cream hold its shape for days. It makes beautiful and amazing frosting!
There are three ways to stabilize whipped cream:
- Mascarpone Cheese or Cream Cheese or a combination of both. These shift the flavor of the whipped cream quite a bit.
- Vanilla instant pudding. This is delicious but you have to spread it FAST or it sets up. The flavor is less whipped cream and more the Costco bakery vanilla mousse cake filling.
- Plain old gelatin. This is my favorite because it tastes JUST like whipped cream. You can buy packets of Knox Gelatin at pretty much any grocery store or grab it online.
Don’t Worry About Getting The Frosting Smooth
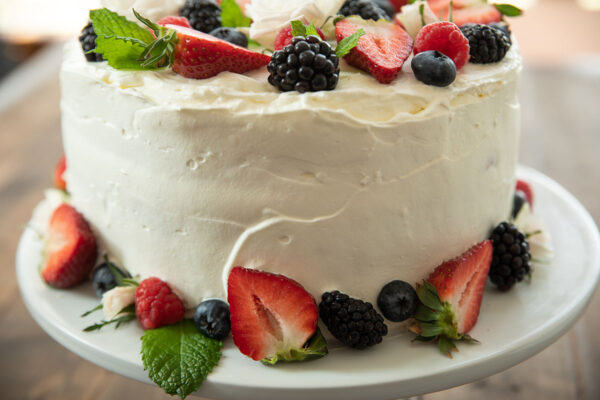
This cake is made beautiful by the fresh berries and whatever else you decorate it with.
See how the sides are not perfectly smooth? The best way to decorate this cake is just to gently smooth the frosting on with a frosting spatula or butter knife. Don’t try to make it perfect!
How To Bake a Perfect Cake
Have you ever tried baking a cake and gotten a big old hill? There are two things you can try:
- Buy a good quality cake pan! This helps with heat distribution for even baking.
- Try wrapping your cake pan! I have a tutorial on it here. When I wrap a cake it always rises fully level! This trick has gotten me through 10 years of baking – I love it!
Easy Berry Chantilly Cake
Ingredients
For the Cake
- 1 box Betty Crocker Yellow Cake Mix 15.25oz
- 1 cup whole milk can use 2% instead
- 1 Tablespoon real vanilla
- 3 eggs
- 1 egg white NOT beaten
- 1 cup melted butter
For the Frosting (This is just whipped cream that will stay set up!)
- 3 teaspoons unflavored gelatin Knox is the name brand but any brand is fine
- 4 Tablespoons cold water
- 3 cups heavy whipping cream 40% is recommended
- 1 1/3 cup powdered sugar
- ¾ teaspoon almond extract (can sub vanilla if preferred)
- ¼ teaspoon salt
To Assemble the Cake Layers & Decorate
- 6 oz blueberries
- 12 oz raspberries
- 16 oz strawberries
- 6 oz blackberries
- ¾ cup of jam see note on types
- Fresh mint leaves and white spray roses are optional garnishes
Instructions
- Tip: A great cake is baked in such a way that it rises flat and doesn't need to be leveled! The sides and bottom will be more tender and the entire cake is taller and more fluffy. See the full tutorial here.
To Make the Cake
- Put one of your oven racks in the middle of the oven. Preheat the oven to 350 F.
- Line the bottoms of two 9” cake pans with parchment paper.
- Grease the sides of the cake pans with butter or pan spray. (I prefer butter but either works.)
- Put the cake mix in a large mixing bowl.
- Add the milk, vanilla, eggs and the egg white (you do NOT need to beat the egg white – just toss it into the bowl).
- Use a hand mixer and mix on low speed for 30 seconds.
- Add the melted butter and use a hand mixer to beat for two minutes with a timer. (If beating by hand beat vigorously for two minutes with a timer!) Not beating the cake batter well can cause the cake to be dense and not rise well.
- Divide the batter equally between the pans. Bake on the middle rack of your oven for 23-28 minutes. The cake is done when is starts to pull away a little bit from the sides and a toothpick or cake tester inserted comes out with moist crumbs but no batter.
- After the cake is baked place the pans on a rack to cool until they are room temperature. (If you are in a hurry you can put the cakes in the refrigerator after the pans are cool enough to handle without oven mitts.
- While the cake is cooling prepare the berries.
- Wash and drain well.
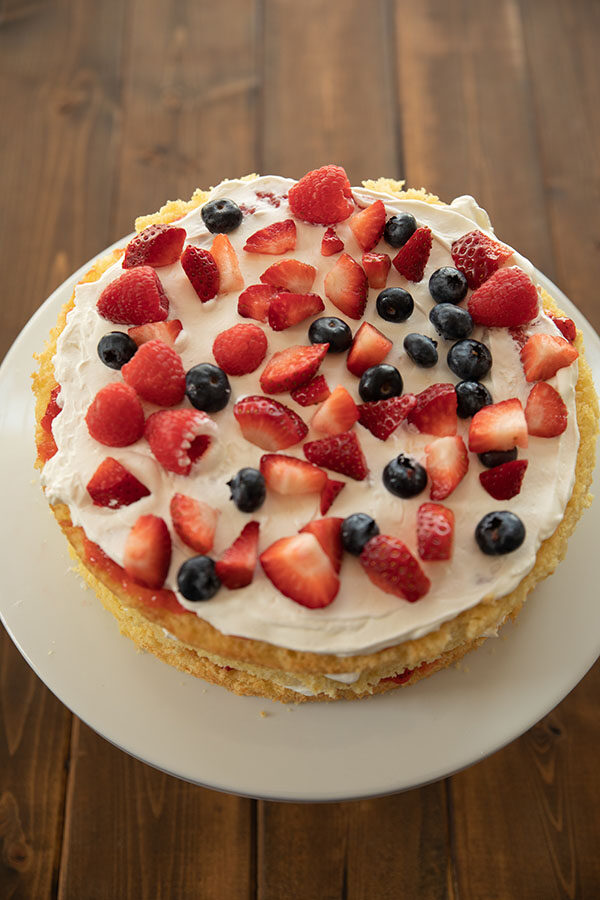
- Put half the blueberries, and half the raspberries into a measuring cup. Dice up strawberries and add them to the cup until you reach 3 cups total.
- Set aside the remaining berries to decorate the cake.
To Make the Frosting
- When the cake is fully cool make the frosting.
- Measure water into a small microwave safe bowl or measuring cup. Stir the gelatin into it. Set it by the microwave while you start the cream.
- In the bowl of a stand mixer combine the cream, powdered sugar, almond extract, and salt. Beat with the whisk attachment on high for 1 minute. Taste and add additional sugar if you like. (You can do this with a hand mixer if you prefer – just use a large mixing bowl – tall and narrow if you have one.)
- Microwave the gelatin mixture for 20 seconds or until the chunk of gelatin turns to thick, syrupy liquid.
- Turn the mixer on high and continue beating the cream while slowly pouring the gelatin into the cream in a thin stream.
- Beat until stiff peaks form.
To Assemble the Cake
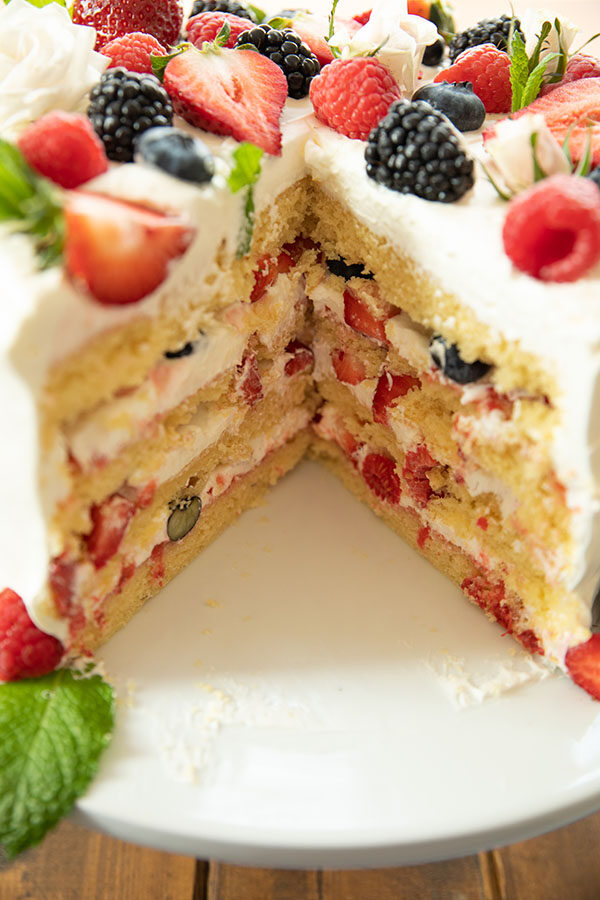
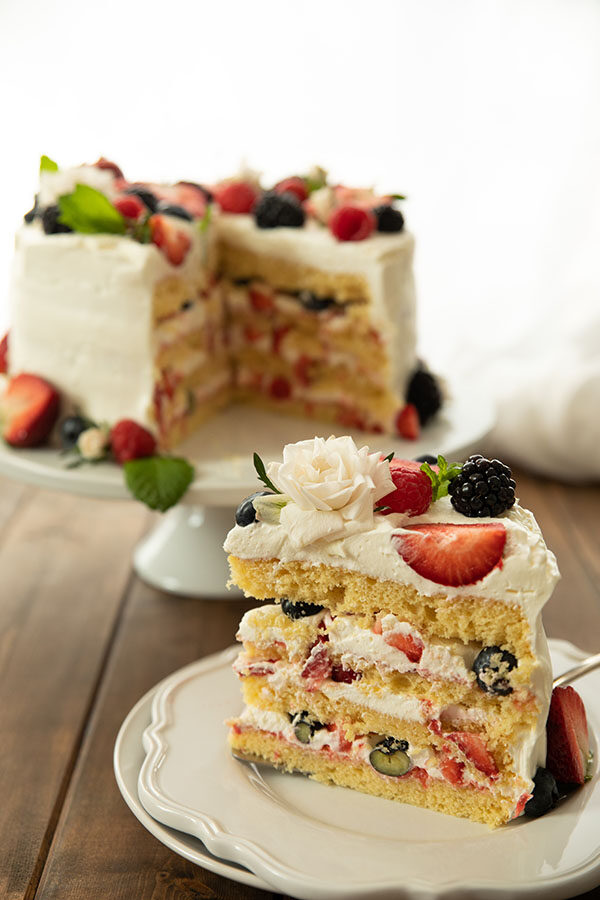
- Slice each cake in half horizontally to make it into two layers. Use a thin cookie sheet without sides or a dinner plate to slide the top layer off of the bottom.
- Layer #1: Place the first layer of cake in the center of your serving plate. Use a butter knife to spread ¼ cup of the jam across the cake. Use a frosting spatula or butter knife to spread about ½” of frosting on the layer. Scatter about 1 cup of berries across the layer. Gently press them down into the frosting. They won’t be perfectly level – don’t worry about it.
- Layer #2: Put another layer of cake on top of the 1st one. Repeat the process with jam, frosting and berries.
- Layer #3: Put another layer of cake on top of cake. Repeat the process with jam, frosting and berries.
- Layer #4: Put the last layer of cake on top. Use a frosting spatula to tuck some frosting into the sides of the cake where there are gaps between layers.
- Apply some “frosting glue” to the side to hold crumbs down: This means spread a thin layer of frosting around the sides of the cake not worrying about crumbs. This will look messy.
- Frost the top of the cake with a solid 1/2” of frosting. Add enough frosting to make the cake level. Smooth it some but don’t fuss too much because we are going to cover it all with decorations. It is supposed to look casual.
- Add frosting to the sides of the cake over the “glue layer”. Again, smooth some but not overly much. A rough, natural look is the goal.
- Garnish the cake with the remaining berries. It looks good to have some whole strawberries and some half berries. This is where I use blackberries for additional color and texture. Fresh mint leaves and white spray roses also look great here. I decorate the top and then put some details along the sides at the base of the plate.
Storing and Serving the Cake
- I make the cake a few hours before serving and leave it uncovered in the refrigerator.
- Serve it COLD for best flavor and texture.
- Cover leftovers with plastic wrap.
- This cake won’t last long because it has cut fresh berries in it! It tastes best the first day and still great the 2nd day. After day #2 it will start to go downhill. Discard leftovers after 3-4 days. (You can get a few extra days by using only whole berries such as raspberries and blueberries instead of cut up strawberries.)
Helpful Recipe Notes
Your Rating Matters
When you leave a comment or star rating, it means more than you might think. It helps me understand what you’re enjoying, builds trust for other readers, and supports real, tested cooking content. If you have a moment, I’d truly appreciate you sharing your experience. – Mirlandra
Nutrition Estimate
A Note on Nutrition
Nutritional info is an imperfect estimate. Please take it with a grain of salt.

Angela cardinale says
What if I do not have a microwave for the gelatin mix?
Mirlandra says
Hi Angela! That is a great question! You should be able to get the mixture to melt to the right consistency by cooking it over boiling water – so basically how you would melt chocolate in a double boiler. There are instructions on Google 🙂 Thanks for asking! And good luck with the cake – let me know how it goes!
Mariana says
This was a huge hit for my sisters bday! I am not a cook/baker etc. but I impressed everyone with this cake. I had people asking to take slices home & thankfully it was a big enough cake to be a let
let a few people take a slide or 2 home with them. It tasted great and it was a gorgeous cake!!!
Mirlandra says
Oh Mariana – thank you! This makes my day!!! I love this cake and it always comes out so beautiful! It is my son’s favorite cake of all the cakes I make (and I make MANY). Tomorrow he is turning 5 and this was his top birthday request! So glad your sister got to enjoy a great cake for her special day 🙂
Connie Brumbaugh says
Is there a reason you use a yellow cake mix and not a white?
Mirlandra says
Hi Connie! This is a great question – I’ve had a lot of readers specifically ask for yellow cake mix recipes so that is a need I am trying to fill. I also happen to like the yellow cake mix in the Betty Crocker line. It has good flavor to start with. Finally when you are adding extra butter or eggs or anything else with a yellow tint to it a white cake mix is gonna turn yellow! While I haven’t tested it you should be able to use a white cake mix instead. I just encourage you to use a good quality one! Best of luck!
Stacy Ellen Kump says
Can I use this frosting recipe for a layered funfetti cake?
Mirlandra says
Absolutely!!! I use it on all sorts of cakes! It is a favorite of mine for pound cake with berries in the springtime.
Amie says
Does it matter if I use salted or unsalted butter?
Mirlandra says
Hi Amie – Great question! The general rule of recipes is that if a recipe says “butter” it means unsalted. However, with internet recipes I find that some people don’t honor that rule. With my recipes I always specify salted or unsalted now (some of my older ones just say butter and I’m updating those). A stick of salted butter (1/2cup) has 1/4 teaspoon of salt in it! So you can always adjust one of my recipes by either adding 1/4 teaspoon of salt if salted butter is called for and you have unsalted. Or of you have salted and unsalted is called for just use 1/4 teaspoon less salt in the recipe. I hope that helps! Happy baking and enjoy that cake! It is an all around favorite here!
Anna says
Best cake recipe I have ever made! Thank you ❤️🥰
Mirlandra says
Thank you so much!!! I’m so very glad you enjoyed it!
Mickey says
Am I the only one whose cake isn’t thick enough to cut in half? And I used quality pans and damp wraps. I just feel like there’s not as much batter in a box anymore
Mirlandra says
Hi Mickey,
I will say that a LOT of products are experiencing shrinkage which is driving me CRAZY! The other day I bought a package of what I thought was “regular” size Oreos to make ice cream and it turned out I had bought the family size! I haven’t seen it in cake mixes but I only buy them occasionally. I guess I will have to keep an eye out.
The other thing I would say is always check your expiration date. While many foods last well beyond expiration cake mix is not one of them. The leavening can go bad and if it is even a little past the date it may not rise well for you.
The only other thing that might be at play here is pan size. You can double check that you had the right size of pan. Or actually one more thing… But this is the least likely. It occurs to me that you might want to put a thermometer in your oven if you suspect it is running hot. Ovens can get off of temperature and then things can cook wonky if your oven is too hot but I think if this was happening enough to impact your cake rise you would be noticing other cooking issues (burned food, food that was done way too early etc).
Sorry, I hope that gives you a few ideas to check! The shrinkage situation is frustrating for sure! For clarity I wish they would just change the price but leave the package the same size.
Harini says
Hello. I followed your recipe and made this berry chantilly cake step by step . Made it for my daughter’s 4th birthday party . It was a huge hit. Thank you so much . This was my first time baking a cake with frosting. I would love to share pictures if I could.
Mirlandra says
Thank you so much for sharing with me. I’m so glad you enjoyed it so much! This is a favorite with my little ones. It is just so fresh and fun 🙂
Claud says
Anything I can use other than almond extract? I’m not a fan of the taste.
Mirlandra says
Absolutely! You could totally do vanilla extract instead! No problem.
Rachel says
I love how the flavors of this explode in your mouth. This is such a fun cake to see, eat and experience.
Mirlandra Neuneker says
Thank you! I love making this one. It’s perfect to eat!
Avery says
Should you make 2 cakes and cut them in half or make 4 separate cakes?
Mirlandra Neuneker says
Hi Avery – It is better to make 2 cakes and slice each layer in half. I hope that helps. Enjoy the cake!