Craving fresh sourdough but not willing to wait until tomorrow? This same day sourdough bread recipe gets you a golden, crackly loaf with a soft chewy crumb — start to finish in one day. No overnight cold proof, no waiting until morning. Just really good bread in 8 hours!
The secret is a warm bulk ferment that turbocharges your timeline and a quick flash freeze before baking that gives you the oven spring you’d normally get from an overnight rest. It sounds a little unhinged. It works beautifully. Besides – life is more fun with a little unhinged!


New to sourdough? Start Here! How To Feed Sourdough Starter Beginners Guide Easy Sourdough Bread Recipe for Beginners (Artisan Loaf)
Why You Will Love This Same Day Sourdough Bread Recipe
- Fresh Bread by Dinner: Start in the morning and you are pulling a hot loaf out of the oven the same evening. No planning ahead, no sleeping on it, no waiting.
- No Overnight Cold Proof: The freezer does the work of the fridge in 60 minutes flat. It is a little bit of kitchen wizardry and I am here for it.
- Same Great Results: Crackly crust, chewy open crumb, a light tangy sourdough flavor. Skipping the overnight rest doesn’t mean skipping the good stuff.
- Fits a Real Day: A little hands-on time in the morning, mostly hands-off in the afternoon, and bread on the table for dinner. My kind of recipe.
- Perfect Weekend Bake For 9-5rs: Work all week AND fit in a quick loaf on the weekend! Sourdough can fit into anybody’s life!
What Makes This a Same Day Sourdough Recipe
Most traditional sourdough recipes follow a two-day rhythm: mix and ferment on day one, cold proof overnight in the fridge, bake on day two or three. It works really well and I love it — but sometimes you just want bread today.
This same day sourdough bread recipe makes two key changes to collapse that timeline into a single day.
First: A warm bulk ferment instead of a slow room-temperature rise. Fermentation is driven by heat. The warmer the environment, the faster the wild yeast gets to work. A traditional room-temperature bulk ferment at 70°F might take 8-10 hours. Crank that up to around 95°F and you can cut it down to 3-4 hours. Same process, same results — just faster.
Second: A 60-minute freezer chill instead of an overnight cold proof. The cold proof in a traditional sourdough recipe does two important things — it firms the dough for better scoring and builds tension for a stronger oven spring. Putting your shaped loaf in the freezer for a full 60 minutes while the oven preheats accomplishes both of those things in a fraction of the time. It is not the same as a 12-hour cold ferment in terms of flavor development, but for a same-day bake it is a genuinely smart shortcut when you need it.
One more difference: more starter. This recipe calls for 150g of active starter instead of the 100g used in the Easy Sourdough Bread Recipe for Beginners. More starter means more wild yeast to power a faster rise — essential when you are working on a compressed timeline.
A quick honest note about your kitchen temperature: This recipe really needs the heat. A 70°F kitchen isn’t going to give you a true same-day bake. You’ll still get great bread eventually, but the bulk ferment will stretch well past 4 hours and you may find yourself baking late into the evening. Read the section below on creating a warm environment and set yourself up for success before you start.
How to Create a Warm Environment for Bulk Ferment
This is the engine of your same-day timeline, so it is worth thinking through before you begin. You are aiming for around 85-95°F. Here are the best ways to get there:
Oven Proofing Setting: This is my personal favorite and the easiest option if your oven has it. Most proofing settings hover right around 85-95°F — perfect. Just keep an eye on it and check your dough every 30-45 minutes because things move fast at that temperature.
Warm Oven, Turned Off: Preheat your oven to 350 for ONE MINUTE then turn it OFF. The residual warmth creates a cozy environment without cooking your dough. If the oven gets cold repeat the process. (Because this is going to take a few hours you might need to do it a few more times.)
Heating Pad in a Box or Cooler: Set a heating pad on low, put it in the bottom of a cooler or cardboard box, and set your bowl of dough on top of a folded towel above it. This creates a remarkably consistent warm chamber and is a great option if you don’t want to tie up your oven.
Warm Spot Near the Stove: If you are cooking or baking other things, the top of the stove or a warm corner of the kitchen can work in a pinch. Just know that ambient kitchen warmth is less reliable and your timing may vary.
The bottom line: If you can get your dough into a reliably warm environment, this recipe works beautifully. If your kitchen is running cool and you don’t have a good heat source, give yourself extra time — or save this one for a warm summer day when your kitchen naturally runs hot.
Same Day Sourdough Bread Ingredients
This recipe keeps things simple on purpose. Four ingredients, nothing fancy.
Active Sourdough Starter (150g — fed and happy): Your starter is doing extra heavy lifting in this recipe, so it needs to be good and active. Feed it the night before bake and use it in the morning. It will be a little past peak but for most strong starters this is fine. If you want it to be closer to peak you can feed it a 1:2:2 feeding at bedtime. (One part starter, one part water, one part water.) A sluggish starter on a compressed timeline is a recipe for a dense loaf. Don’t skip this step. Get my complete guide on sourdough starter here.
Bread Flour (500g): Bread flour gives this loaf the strong gluten structure it needs for a good rise and that chewy, satisfying crumb. I use Turkey Brand from Costco but any bread flour works well. Do not substitute all-purpose flour without adjusting the recipe — they are not interchangeable. I consider it a bonus that bread flour is higher protein which is good for your bread AND good for you!
Lukewarm Water (350g): Room temperature tap water is perfect.
Fine Grain Sea Salt (10g): Salt strengthens the dough, controls fermentation, and makes everything taste like bread and not cardboard. Use fine grain sea salt and skip the pink Himalayan or Real Salt — a pink streak in your dough later will look alarming if you don’t know what it is.
Same Day Sourdough Schedule
One of the best things you can do for yourself with this recipe is map out your day before you start. Here is a simple example of how the timeline fits together. Your actual times will shift depending on how warm your bulk ferment environment is, but this gives you a realistic picture of what the day looks like.
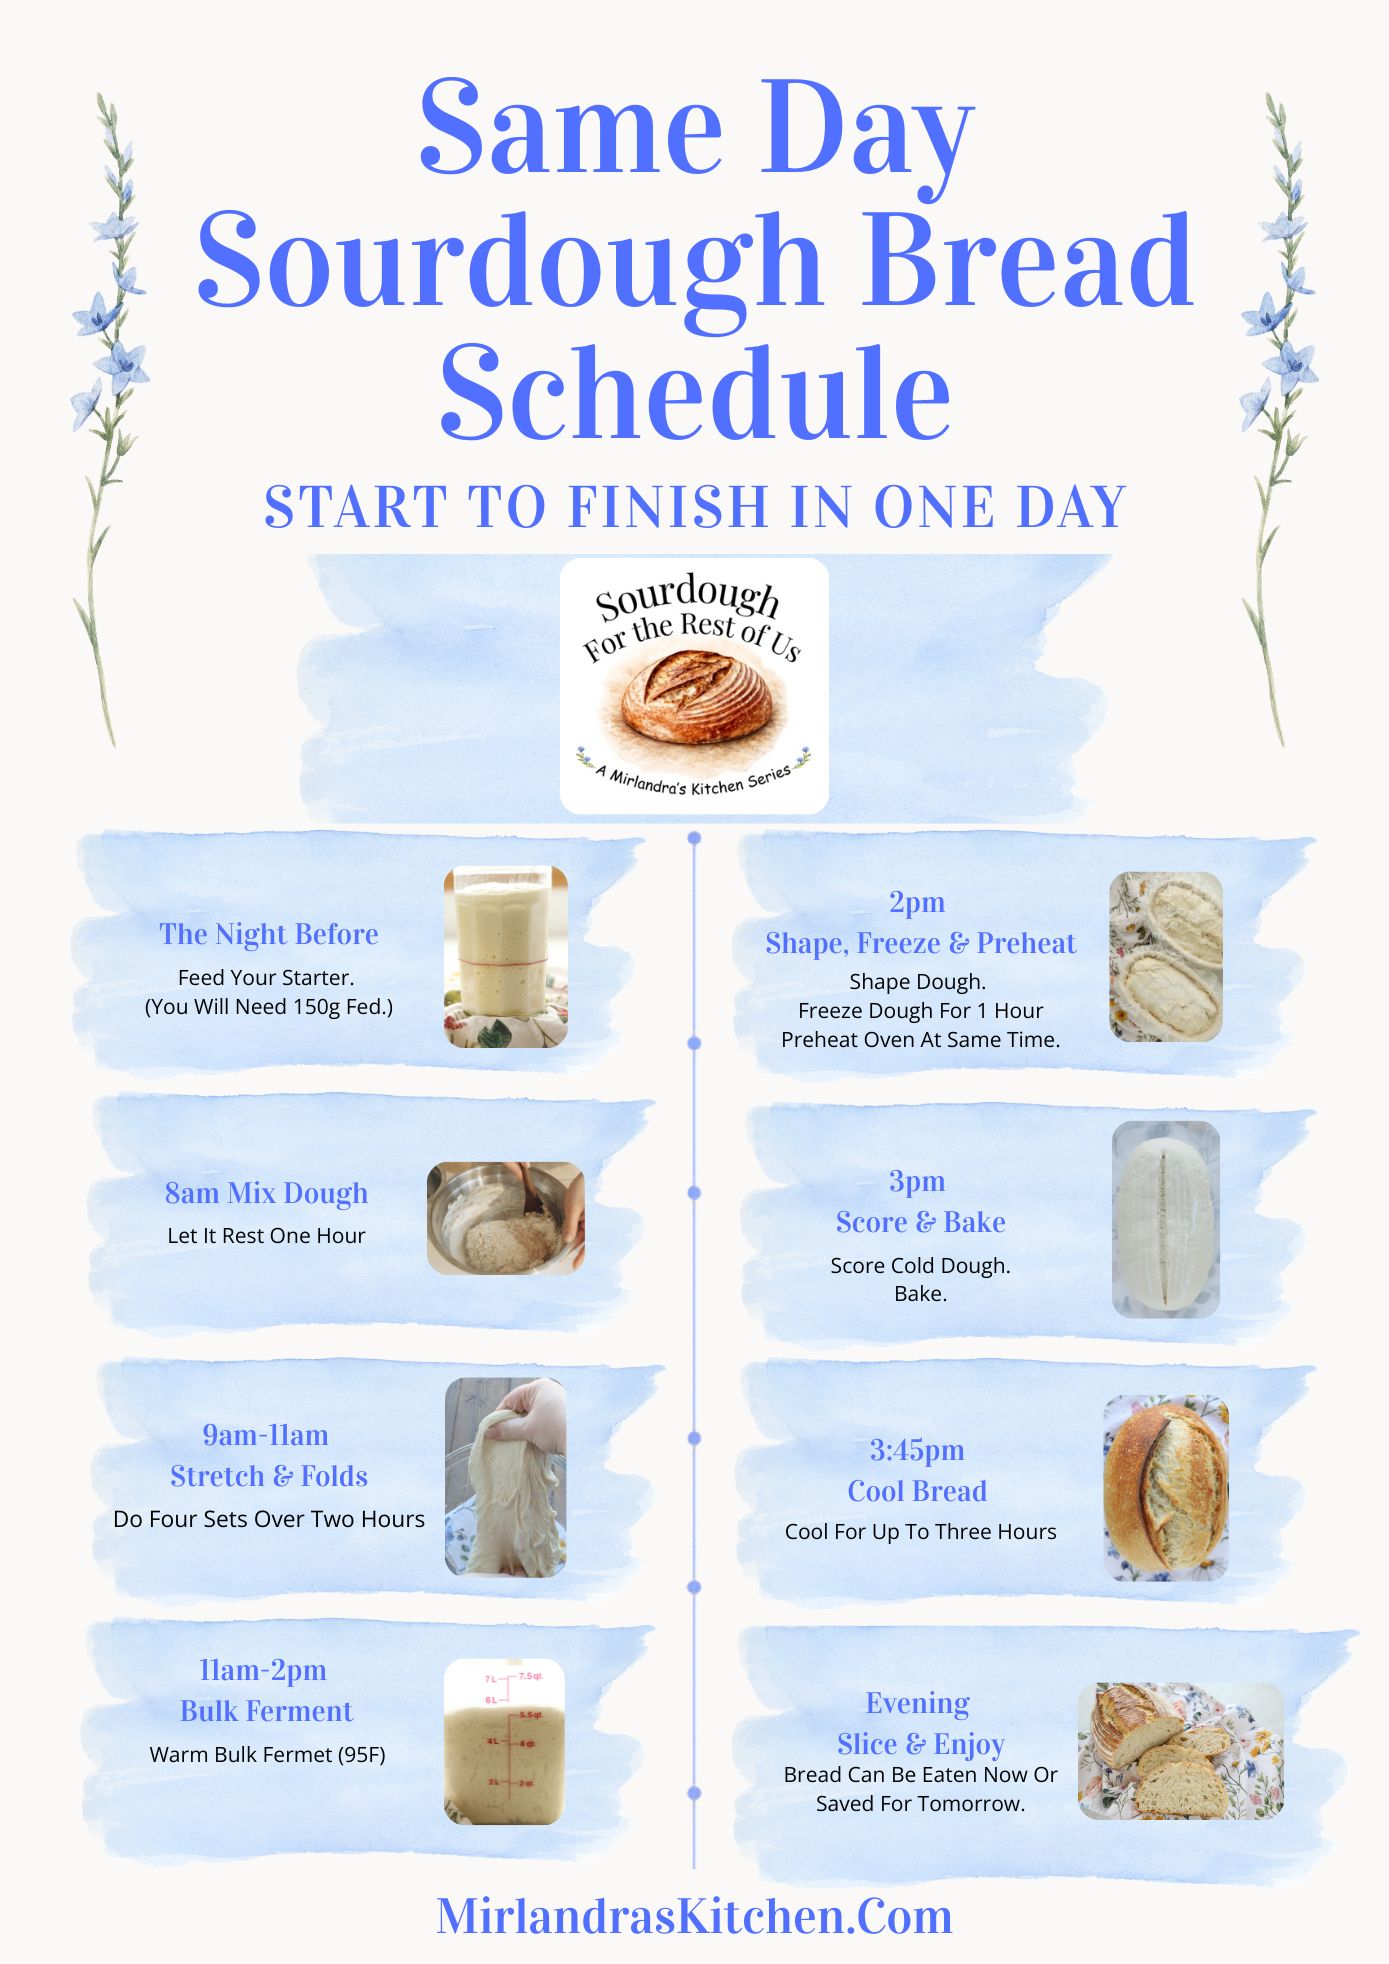
The most important thing to understand: most of this day is hands-off. You are not standing over the dough for hours. You are checking on it, going about your life, and coming back. The active time is maybe 30-40 minutes spread over the whole day. The rest is waiting — and the bread is doing all the work.
The Flash Freeze Trick (And Why It Works)
Let’s talk about the freezer step because I know it sounds a little weird and I want you to trust it.
In a traditional sourdough recipe, the shaped dough goes into the fridge for 8-36 hours before baking. That cold rest does a few really important things: it firms up the dough so it holds its shape and scores cleanly, it creates surface tension for better oven spring, and it gives the crust time to develop a slight skin. All of that adds up to a loaf that bursts open beautifully in a hot oven instead of spreading flat.
The freezer does the same job — just in 60 minutes instead of overnight.
Cover your shaped dough with a shower cap or a clean tea towel and put it in the freezer for a full 60 minutes while your oven and Dutch oven preheat. When it comes out it will be noticeably firmer and slightly cold to the touch. That is exactly what you want. Score it right away while it is still cold and get it into the hot Dutch oven immediately.
A few things to know:
- Cover it. An uncovered loaf in the freezer will dry out on the surface unevenly. A shower cap is perfect. A tea towel also works.
- 60 minutes, not 45. The full hour matters. This is not the place to rush — the oven needs the full preheat time anyway, so let the dough have its full chill.
- Don’t freeze it longer than 60 minutes. You want it firm and cold, not actually starting to freeze through. If your schedule gets derailed, pull it out and let it sit in the refrigerator until you are ready to bake.
No Dutch Oven? No Problem
Good news — you can make this same day sourdough bread recipe with a graniteware roasting pan instead of a Dutch oven. The roaster method works just as well for this recipe as it does for a traditional loaf.
The one key difference: do not preheat the graniteware pan. Unlike a Dutch oven which goes into the oven cold and preheats for a full hour along with the oven, graniteware loads cold. You score your dough, set it into the room-temperature roaster, give it a spritz of water and put the whole thing into the hot oven. The moisture from the dough creates its own steam chamber and you get a beautiful crackly crust every time.
I have a complete guide to baking sourdough without a Dutch oven here with everything you need to know about using a graniteware roaster — including the shield trick for preventing a burnt bottom and what size pan to look for.
Mirlandra’s Recipe Tips
Tip #1: Your starter has to be ready. On a same-day timeline there is no wiggle room for a sleepy starter. Feed it the night before, give it time to peak, and don’t use it until it has doubled and looks bubbly and domed. If the starter isn’t ready, the dough won’t be either.
Tip #2: Watch the bulk ferment closely. Warm environments move fast and over-fermented dough is flat, dense, and sad. Check on it every 30-45 minutes once it’s been in the warm environment for two hours. You are looking for doubled size, a pillowy marshmallow appearance, visible bubbles through the bowl, and a slight jiggle when you shake it. When you see those four things, move on — don’t wait for a timer.
Tip #3: Don’t skip the freezer step. I know it sounds optional. It is not. This step is what makes same-day sourdough work. The flash chill is doing the job that an overnight cold proof would normally do. Skip it and you will likely get a loaf that spreads rather than springs.
Tip #4: Score with confidence straight from the freezer. Cold dough scores beautifully — it holds its shape and doesn’t drag. Get your lame or sharp knife ready before you pull the dough out and make your scores immediately. Quick and decisive. Don’t let it sit on the counter warming up before you score it.
Tip #5: Use a scale. I say this in every sourdough post and I will say it here too. Measuring by cups is not accurate enough for sourdough. A scale is a $10 investment that eliminates an entire category of baking failure. Please use one.
Final Thoughts on Same Day Sourdough Bread
Same day sourdough is one of those recipes that feels like a cheat code once you get it down. The warm bulk ferment and the freezer trick together solve the only real complaint most people have about sourdough — the waiting. You still get the crackly crust, the chewy crumb, and that unmistakable sourdough flavor. You just get it the same day you start.
If you are new to sourdough and this is your first loaf, I’d actually suggest starting with the Easy Sourdough Bread Recipe for Beginners first to get comfortable with the process before you try to speed it up. But if you’ve got a loaf or two under your belt and you want bread today — this recipe is for you.
Come find the rest of the series at Sourdough for the Rest of Us and let me know in the comments how your same-day loaf turns out!

Same Day Sourdough Bread Recipe (Start to Finish in One Day)
Ingredients
- 350 g lukewarm water
- 150 g active sourdough starter fed and happy — extra for this recipe!
- 500 g bread flour
- 10 g fine grain sea salt
Instructions
Autolyze – Mix and Rest
- In a large mixing bowl, add the water, starter, flour, and salt. Mix with a dough whisk or wooden spoon until no dry bits remain — you want a shaggy, rough dough with all the flour incorporated.
- Cover the bowl and let it rest on the counter for 1 hour.
Stretch and Folds – Build the Structure
- Get your hands wet to prevent sticking. Grab one side of the dough and pull gently until it resists, then fold it back over itself into the bowl. Rotate the bowl ¼ turn and repeat — four stretch and folds makes one set. (See my complete stretch and fold video guide here.)
- Cover and rest 30 minutes. Repeat for a total of 4 sets over about 2 hours.
Bulk Ferment – The Fast and Warm Rise
- Cover your dough and place it in a warm environment around 95°F. I use the proofing setting on my oven — see Note #1 for other ways to create a warm environment.
- Watch your dough closely at warm temperatures — it moves fast! Check it every 30-45 minutes. You are looking for all four of these signs before moving on:1. The dough has doubled in size2. It looks pillowy and soft like a marshmallow3. It jiggles slightly when you shake the bowl4. You can see bubbles along the sides and bottom of the bowl (assuming you are using a clear glass bowl).
- At 95°F expect this to take approximately 3-4 hours. Do not skip watching the dough — over-fermented dough will give you a flat, dense loaf.
Shape the Dough
- Line your banneton with a hairnet and dust generously with rice flour. Lightly mist your counter, hands, and dough scraper with water — no flour on the counter!
- Use your scraper to ease the dough out of the bowl so the soft top lands face-down on the counter with the sticky side up.
- To shape a round boule: Picture the dough as a pie cut into 8 slices. Grab the edge of each imaginary slice, pull it to the center, and pinch it in. Work your way around all eight "slices" until you have a tight ball. Gently lift and place it into the banneton, pinched side up (it becomes the bottom when you bake). To shape an oval batard instead, see Note #2.
Preheat the Oven and Flash Freeze the Dough
- Place your Dutch oven with its lid inside your oven and preheat to 450°F. Set a timer and let it preheat for a full hour.
- Here's the same-day secret: while the oven preheats, cover your shaped dough with a shower cap or clean tea towel and place it in the freezer for a full 60 minutes. This flash chill firms up the dough quickly, making it easier to score and giving you better oven spring. But set a timer – don't let it hang in your freezer more than an hour!
Score and Bake
- Cut a piece of parchment paper long enough to create handles for lifting.
- Sprinkle rice flour on the exposed top of your dough, center the parchment, flip the banneton to release the dough onto the parchment. Score with at least one confident slash from top to bottom — about ¼" deep at a 45-degree angle. (Get my complete scoring guide here.)
- Safety Note: Your Dutch oven is extremely hot. Use oven gloves and a baking rack to set the pot on while you load the dough.
- Use the parchment as handles to gently lower the dough into the hot Dutch oven. Spritz well with water, place the lid on, and return to the oven.
Timing Your Bake:
- Bake 30 minutes lid on at 450°F
- Remove lid, spritz dough with water, reduce heat to 410°F, bake 15 more minutes until deep golden
- After the Bake
- Remove the loaf from the Dutch oven immediately and place on a wire rack to cool. Leave the Dutch oven in the oven to cool down slowly.
- Sourdough continues to cook as it cools. Wait at least 3 hours before slicing or you’ll get a gummy crumb. I know. It’s the cruelest part.
Helpful Recipe Notes
Your Rating Matters
When you leave a comment or star rating, it means more than you might think. It helps me understand what you’re enjoying, builds trust for other readers, and supports real, tested cooking content. If you have a moment, I’d truly appreciate you sharing your experience. – Mirlandra
Nutrition Estimate
A Note on Nutrition
Nutritional info is an imperfect estimate. Please take it with a grain of salt.
New to sourdough? Start Here! How To Feed Sourdough Starter Beginners Guide Easy Sourdough Bread Recipe for Beginners (Artisan Loaf)
Rachel Zoda says
I’ve been baking sourdough for years but I’ve always struggled with oven spring and texture- but not today! This recipe turned out perfect! So grateful for the very thorough instructions, it felt like Mirlandra was right in my kitchen with me helping me with every step.
Mirlandra Neuneker says
Wow, Rachel! I’m so excited to hear this. Thank you for sharing. I love that this was helpful for you!!! Nailing oven spring and texture feels SO good!