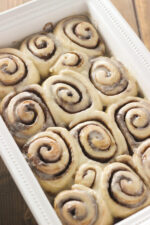
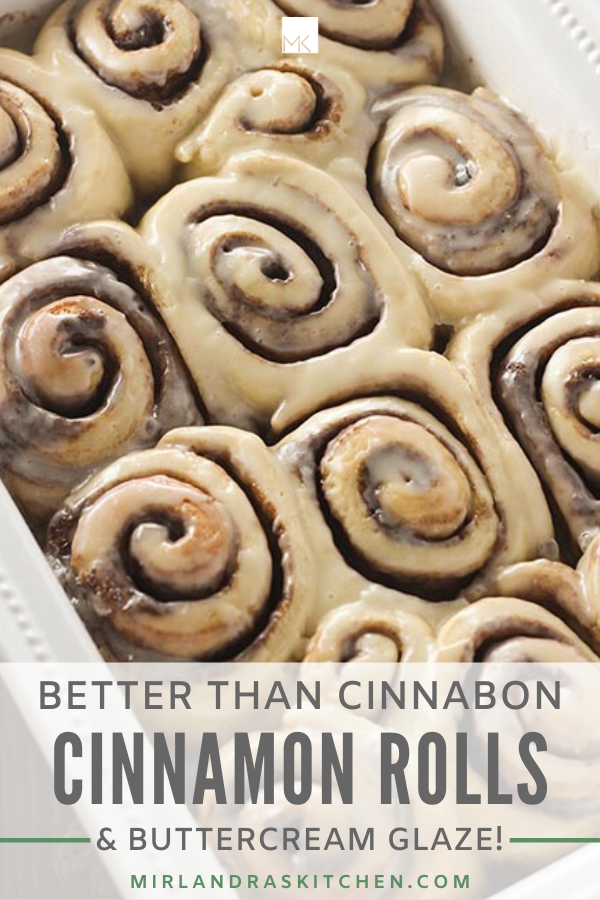
These are the cinnamon rolls people request by name. Soft, pillowy dough, a brown sugar cinnamon filling that caramelizes into a sticky golden bottom, and a buttercream glaze that soaks into every warm layer. Better than Cinnabon and made exactly the way you want — bread machine, stand mixer, by hand, or overnight.

Some recipes just work. This is one of them.
These homemade cinnamon rolls have been in my kitchen for decades — soft, pillowy dough wrapped around a brown sugar cinnamon filling and finished with a rich buttercream glaze that soaks into every warm layer. They are better than Cinnabon. I know that’s a bold claim. Make them once and you’ll agree.
The best part? You can make the dough however works best for you. Bread machine cinnamon rolls are my personal favorite — you dump everything in, walk away, and come back to perfect dough. But a stand mixer works beautifully, and by hand is absolutely an option if that’s your style. Same recipe, same results, your choice of method.
And if you want warm cinnamon rolls without the morning chaos? The overnight method has you covered. Shape them the night before, refrigerate, and bake fresh in the morning. I’ll walk you through all of it.
Why This Cinnabon Cinnamon Roll Recipe Works
- You control the method. Bread machine, stand mixer, or by hand — this bread machine cinnamon roll recipe was built to flex. Pick what works for your kitchen and your morning.
- The dough is a dream to work with. Soft, smooth, and not the least bit sticky — this is a genuinely beginner-friendly dough. It rolls out beautifully, handles without drama, and does exactly what you tell it to.
- Your rolls won’t spiral up into mountains. You know those cinnamon rolls that puff up “happy to see you” and lose all their beautiful layers in the oven? That doesn’t happen here. Soft butter — not melted — mixed with brown sugar and cinnamon into a thick paste keeps the filling exactly where you put it.
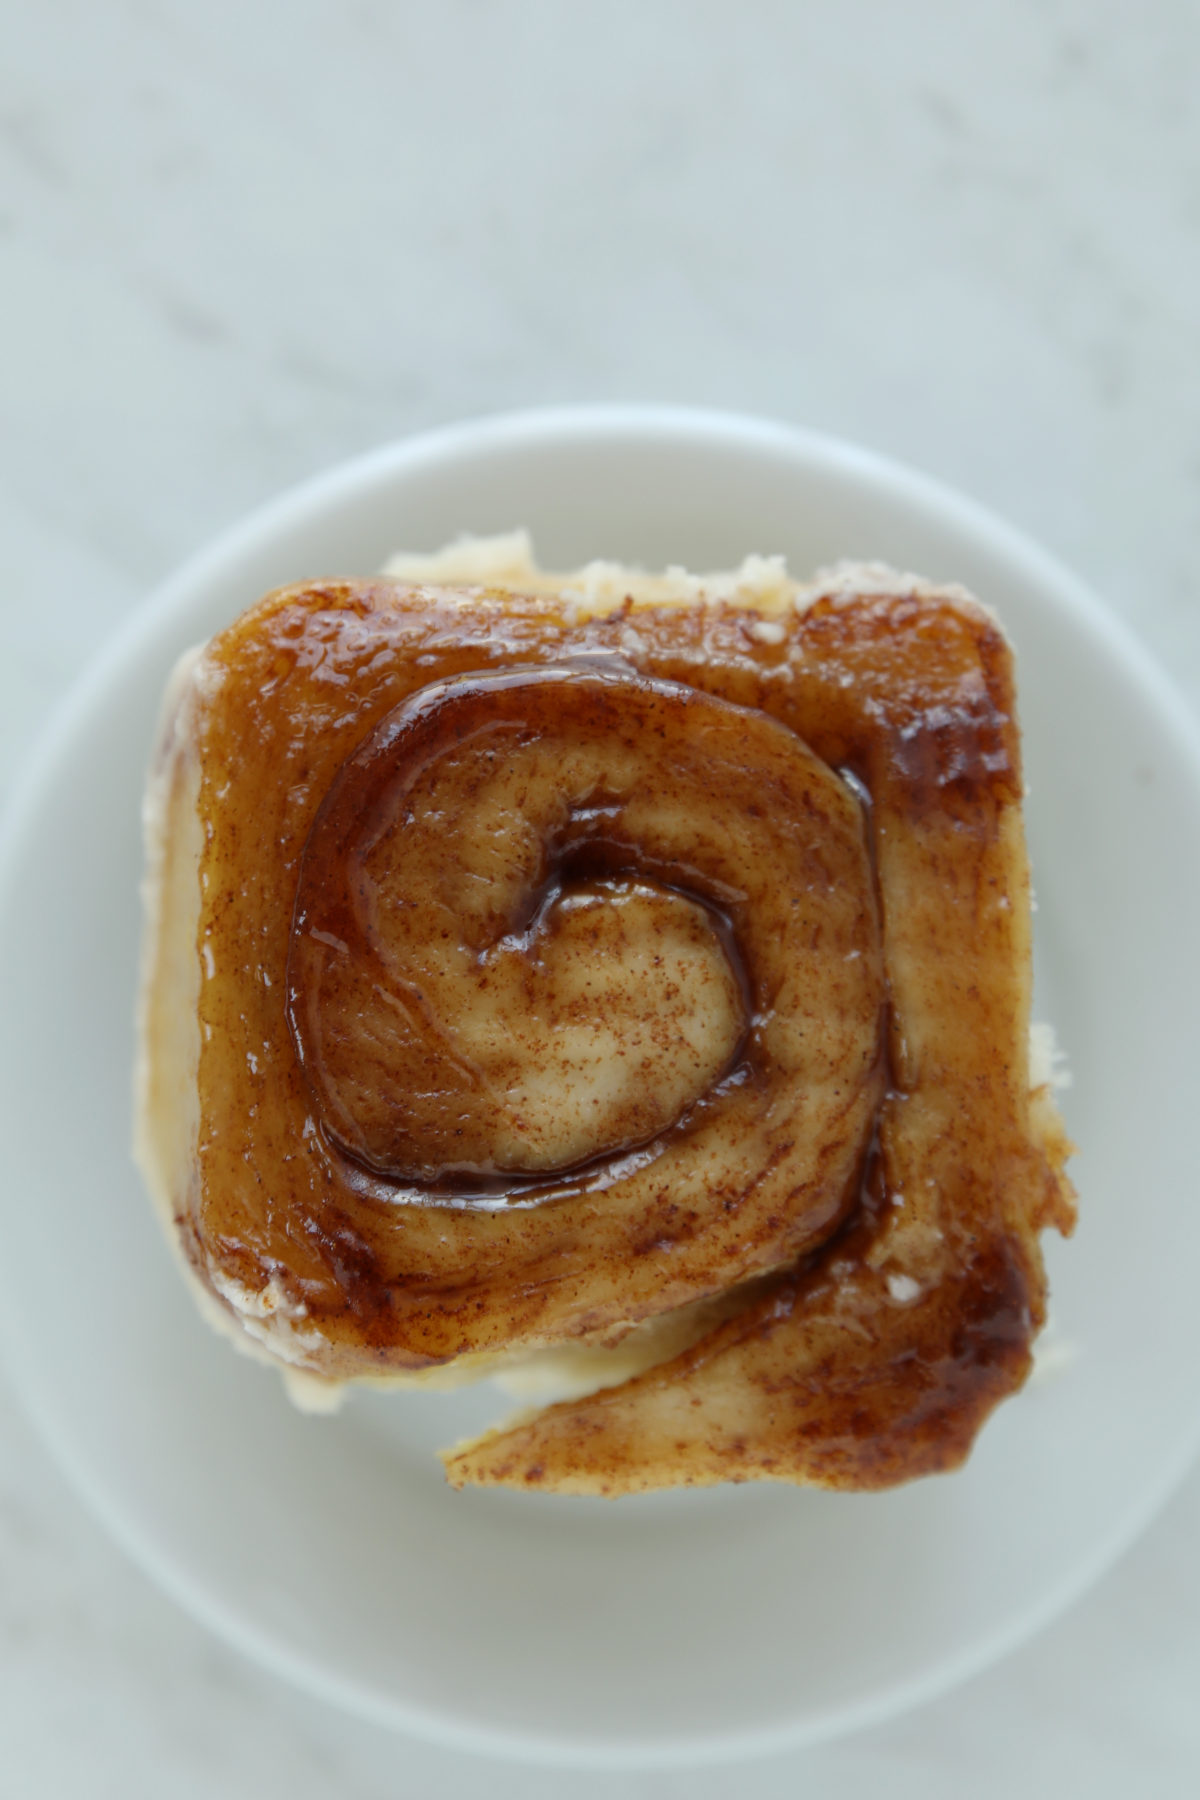
- Hello, caramel bottoms. The brown sugar filling caramelizes against the pan into a sticky, golden layer on the bottom of every roll. It’s the detail that makes people flip a roll over just to look at it before they eat it.
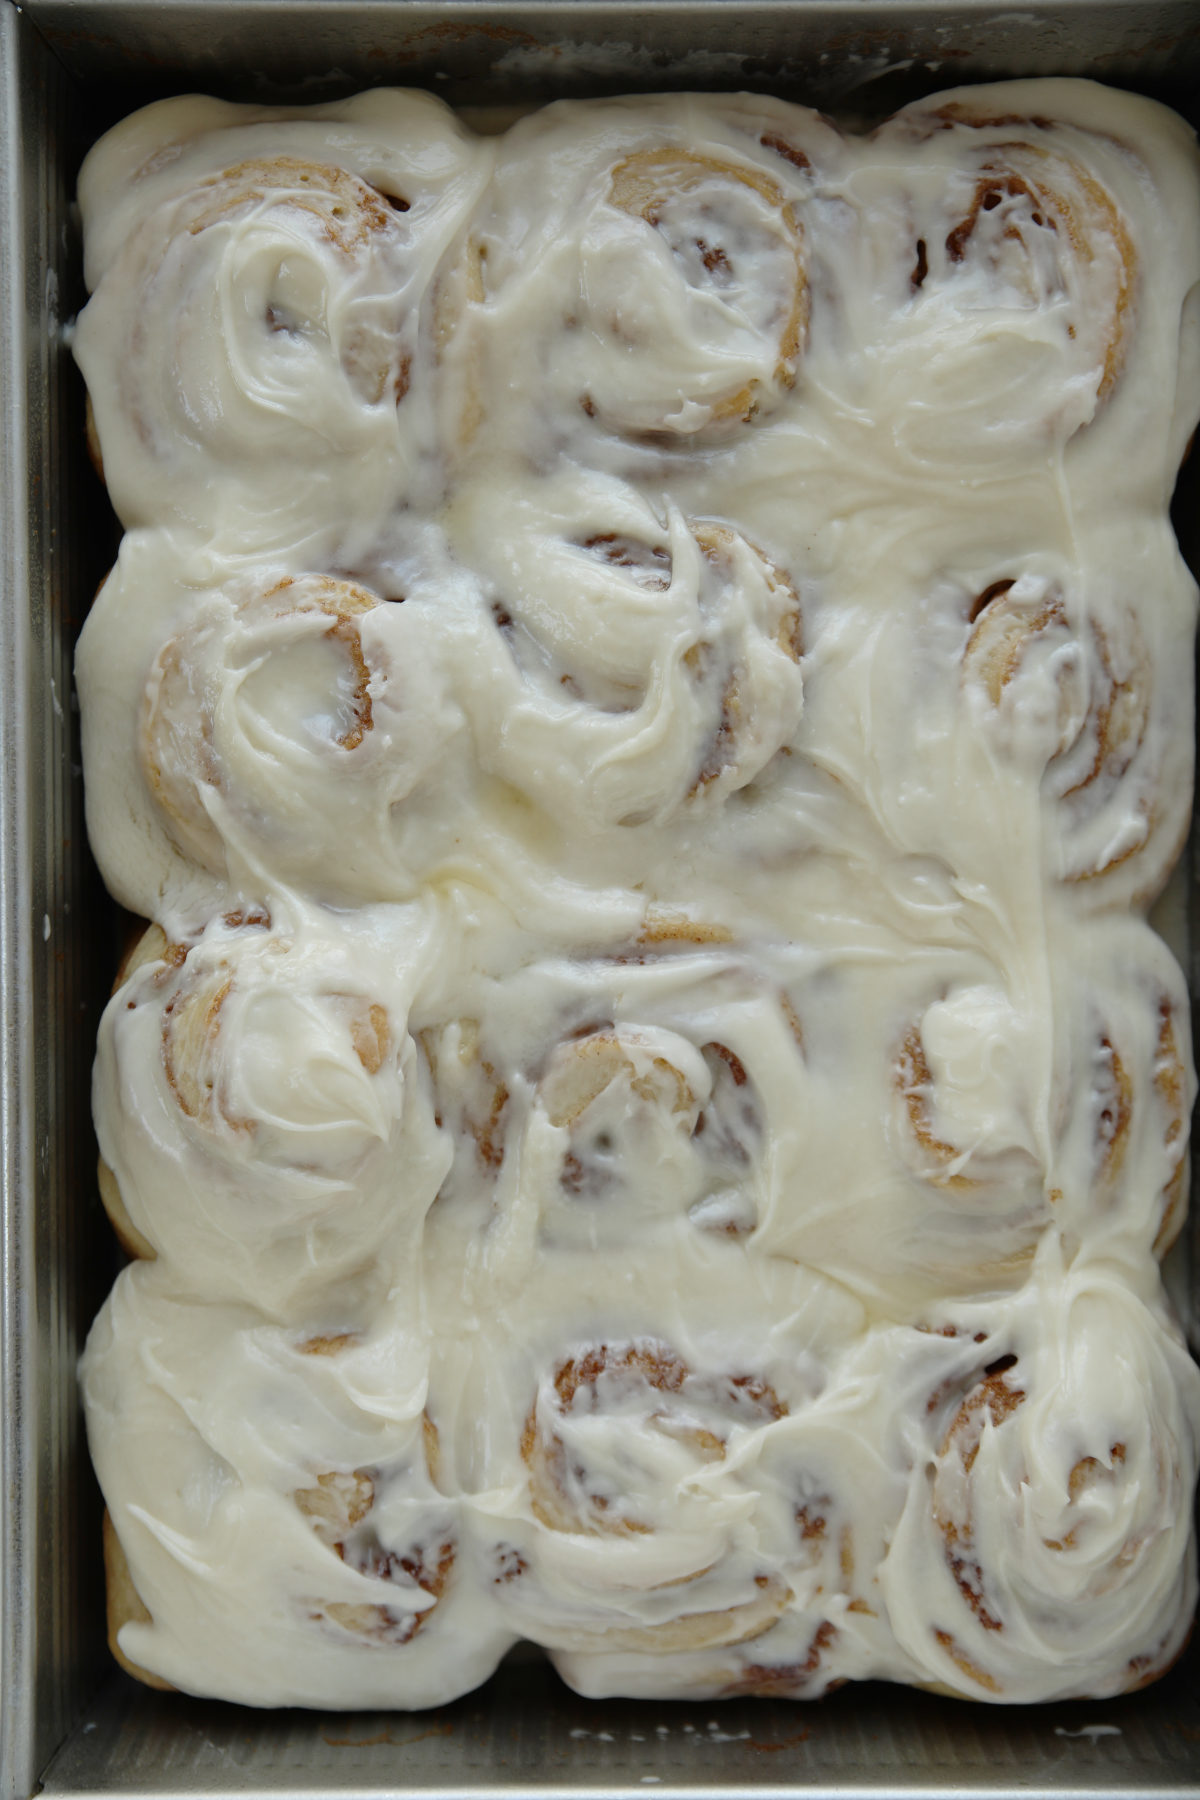
- The glaze is the secret weapon. This isn’t a powdered sugar drizzle. It’s a proper buttercream thinned to a glaze that soaks into warm rolls and keeps them moist for days.
- Overnight option built in. Shape the night before, refrigerate, bake fresh in the morning. Hot homemade cinnamon rolls without the 6am alarm.
Cinnamon Roll Timing at a Glance
One of the best things about this recipe is that it fits your schedule. Here’s what each method looks like from start to finish:
Bread Machine
- Add ingredients and start dough cycle: 5 minutes active
- Dough cycle runs: ~90 minutes hands-off
- Shape and fill: 20 minutes
- Second rise: 30 minutes
- Bake: 25-30 minutes
Stand Mixer
- Mix and knead dough: 15 minutes
- First rise until doubled: 60-90 minutes
- Shape and fill: 20 minutes
- Second rise: 30 minutes
- Bake: 25-30 minutes
- If you love to make dough in your stand mixer check out my Bosch VS Kitchen Aid post to learn which mixers do best at what!
By Hand
- Mix and knead dough: 20-25 minutes
- First rise until doubled: 60-90 minutes
- Shape and fill: 20 minutes
- Second rise: 30 minutes
- Bake: 25-30 minutes
Overnight (works with any method above)
- Prep dough and shape: your chosen method above
- Refrigerate overnight: 8-16 hours hands-off
- Second rise from cold: 45-60 minutes
- Bake: 25-30 minutes
Classic morning schedule: Start your bread machine after dinner → shape before bed → wake up to risen rolls ready to bake.
How to Cut Cinnamon Rolls Without Squishing Them
This is where a lot of perfectly good cinnamon rolls meet an unfortunate end. A heavy knife pressed straight down compresses all those beautiful layers, squishes the filling out, and flattens your roll before it ever hits the pan. Here are three methods ranked from favorite to utilitarian.
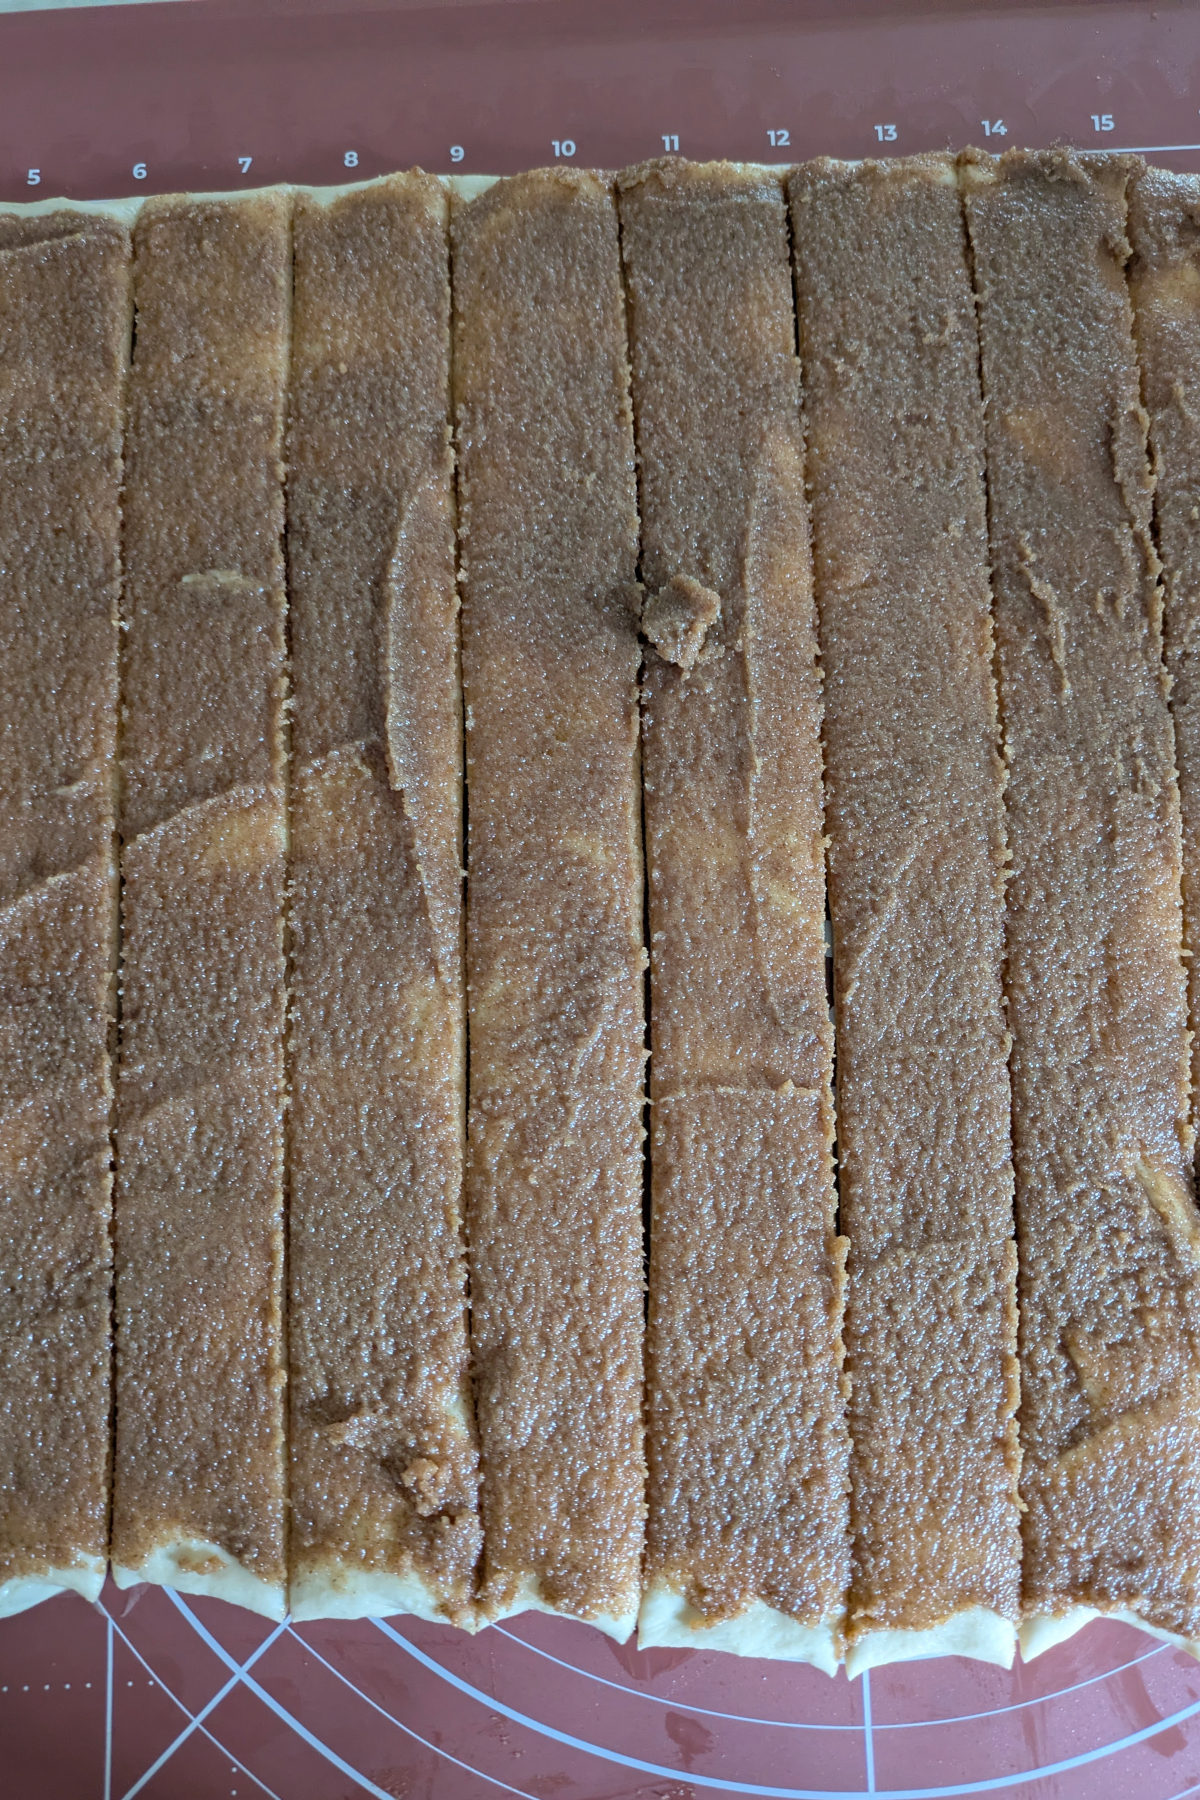
Method 1: Pizza Cutter (My Favorite)
Instead of rolling the dough into a log and slicing it, spread the filling on the rolled out dough and cut it directly into strips with a pizza cutter. Then roll each strip up individually. The rolling blade glides through the dough with zero downward pressure — no squishing, no dragging, no filling carnage. And honestly? Rolling up individual strips is so much easier than wrestling a giant sticky log.
This is also where a silicone dough mat earns its keep. The measurement guides printed right on the mat take all the guesswork out of sizing — roll your dough to the marked rectangle, use the grid lines to cut perfectly even strips, and every roll comes out the same size. No ruler, no eyeballing, no sad lopsided rolls on the outside of the pan. This is the method I use every single time now and I’m never going back.
Method 2: Unflavored Dental Floss (My Faithful Backup)
Roll the dough into a log first, then slide a piece of unflavored dental floss under the log at your cut point. Bring both ends up and over the top and pull in opposite directions. You are essentially garroting the cinnamon roll — and it works perfectly. Clean cuts, intact layers, zero drama. This was my favorite method for years before I discovered the pizza cutter trick.
Method 3: Sharp Knife or Bench Scraper (The Utilitarian)
Use the sharpest knife you have and saw lightly back and forth rather than pressing straight down. A serrated bread knife is ideal if you have a good one. A bench scraper pushed straight down in one fast decisive motion also works. Either way — minimal downward pressure is the goal.
These rolls had 30 minutes to cool before I added the buttercream glaze
How to Make Cinnamon Roll Icing (The Buttercream Glaze)
This is not an afterthought. The glaze is what takes these from a really good cinnamon roll to the cinnamon roll people ask you about.
Most cinnamon roll frosting recipes are just powdered sugar, milk, and vanilla. Fine. Forgettable. This one starts with melted butter and builds into a proper buttercream thinned to a glaze consistency — rich, smooth, and just sweet enough. It soaks into the warm rolls instead of sitting on top like a sugar shell, which is exactly why these stay moist and tender even the next day.
The trick is timing. Pour the glaze over rolls that are warm but not screaming hot. You actually have two great options depending on the look and texture you want:
10 minutes out of the oven — The glaze soaks in deeply and gives you that classic Cinnabon-style glossy, fully glazed look with glaze running down into every layer. This is the “I want maximum gooeyness” option.
25-30 minutes out of the oven — You still get plenty of gooey glaze soaking in because the rolls are still beautifully warm — but you also keep gorgeous visible swirls of buttercream on top. This is the “I want it to look as good as it tastes on the photos” option.
Both are deeply gooey and delicious. Completely your call — just don’t wait until they’re fully cool or the glaze will sit on the surface instead of soaking in.
How to make cinnamon roll frosting:
- Whisk melted butter and powdered sugar together until no lumps remain
- Add milk and vanilla and whisk until smooth and pourable
- Spoon generously over warm rolls and swirl to cover
That’s it. Four ingredients, two minutes, and the best cinnamon roll icing you’ve ever had.
How to Make Overnight Cinnamon Rolls
Want fresh cinnamon rolls without getting up at the crack of dawn? The overnight method is your answer — and it works with all three dough methods. Prep the night before, sleep in, bake in the morning.
The night before:
Prepare your dough using whichever method you prefer — bread machine, stand mixer, or by hand. Roll, fill, and cut the rolls as directed and place them in the greased pan. Cover tightly with plastic wrap and refrigerate. What you’re doing here is called a cold retard — a fancy baking term for slowing the rise way down with cold temperatures. The yeast doesn’t stop working entirely, it just works very slowly, which actually builds more flavor in the dough overnight. So sleeping in is also making your rolls taste better. You’re welcome.
The morning of:
Pull the pan out of the refrigerator and let it sit on the counter while you warm the oven. Preheat your oven to 350°F for exactly ONE MINUTE then turn it OFF. Place the covered pan of rolls into the warm oven and let them rise 45-60 minutes until puffy and just touching.
Important: Remove the rolls from the oven before you preheat it to bake. Then bake as directed.
The cold dough takes longer to rise than fresh dough so don’t rush it. Watch the rolls not the clock — when they look puffy and pillowy and are just touching each other in the pan they are ready to bake.
Storage
Cover leftover rolls tightly and store at room temperature for up to three days. To reheat, microwave individual rolls for 20-30 seconds BUT don’t push it. Overdoing it in the microwave turns a perfectly good cinnamon roll into shoe leather faster than you’d think. A small pat of butter on top before microwaving takes them right back to fresh-out-of-the-oven territory.
These rolls genuinely hold up beautifully the next day thanks to that buttercream glaze soaking in and keeping every layer moist. Day two cinnamon rolls are not a consolation prize around here.
Mirlandra’s Tips for Success With Cinnamon Rolls
Use a metal pan. Metal conducts heat evenly and gives you a better bake on the bottom and sides — hello, caramel bottoms. Glass pans run hotter and slower and just don’t give the same result. I’m a die hard fan of the USA Pan metal baking pan — durable, affordable, and the rolls come out perfectly every time.
Don’t skip the warm rise spot. Yeast has opinions about temperature but you can absolutely be in charge here. If your oven has a proofing setting that is the perfect tool for this — just set it and walk away. No proofing setting? No problem. A cold drafty kitchen will slow things down but the one-minute oven trick puts you in control — preheat to 350°F for ONE MINUTE, turn it OFF, then put your rolls in to rise. Consistent warmth, consistent results every time.
Watch the dough not the clock. Rise times are always a guide not a guarantee. Your kitchen temperature, your yeast, and even the weather can all affect how fast the dough moves. The rolls are ready for the oven when they look puffy and pillowy and are just touching each other in the pan.
Spray the counter, don’t flour it. This is one of those small details that makes a real difference. Flouring your counter adds extra flour to the dough every time you work with it, which can make your rolls dense and tough. A light spray of nonstick cooking spray or a light mist of neutral cooking oil gives you the same non-stick surface without changing your dough at all. Your silicone dough mat works beautifully here too — lightly sprayed it gives you a non-stick surface AND the measurement guides to roll your dough to exactly the right size.
Soft butter not melted for the filling. This one detail makes a real difference. Soft butter mixed with brown sugar and cinnamon into a thick paste stays exactly where you put it. Melted butter runs and takes your beautiful filling with it.
Check doneness the right way. Golden tops are a good sign but not the whole story. Use a fork to gently lift the center layers of a roll in the middle of the pan — no raw dough should be visible. The middle of the pan is always the last spot to finish so if that’s done you’re good to go.
Troubleshooting Your Cinnamon Roll Bake
My rolls turned out dense.
Nine times out of ten this comes down to too much flour in the dough. It happens gradually — a little extra on the counter, a little more when it sticks, and suddenly you’ve worked in way more than the recipe calls for. Spray your counter instead of flouring it and trust the dough. This recipe is supposed to feel soft and slightly tacky, not stiff and dry.
My rolls aren’t rising.
Check your yeast first — it should be fresh and active. Expired yeast should be tossed! Also check your rise environment. A cold or drafty kitchen will stall a rise significantly. Use the one-minute oven trick or your proofing setting to give the yeast a consistently warm place to do its thing.
My filling leaked out everywhere.
This almost always means the butter in the filling was melted instead of soft. Melted butter is liquid and liquid runs. Soft butter mixed into a thick paste with the brown sugar and cinnamon stays exactly where you put it through rolling, cutting, and baking.
My rolls are browning too fast on top.
First check your oven temperature — your oven may simply be running hot. This is more common than people realize and a leave-in oven thermometer is an absolute Godsend if you have frequent browning issues across your baking. If your oven is running 50°F hot you don’t need a repair person — just adjust your temperature setting to compensate and suddenly everything bakes better. If the oven temp checks out, tent the pan loosely with aluminum foil and continue baking until the center rolls are cooked through.
The middle rolls are still raw when the outside ones are done.
The center of the pan is always the last spot to finish — this is normal. Use a fork to gently lift the center layers of a middle roll and check for raw dough. If it’s still gooey give them five more minutes and check again. Don’t pull them early just because the outside rolls look done.
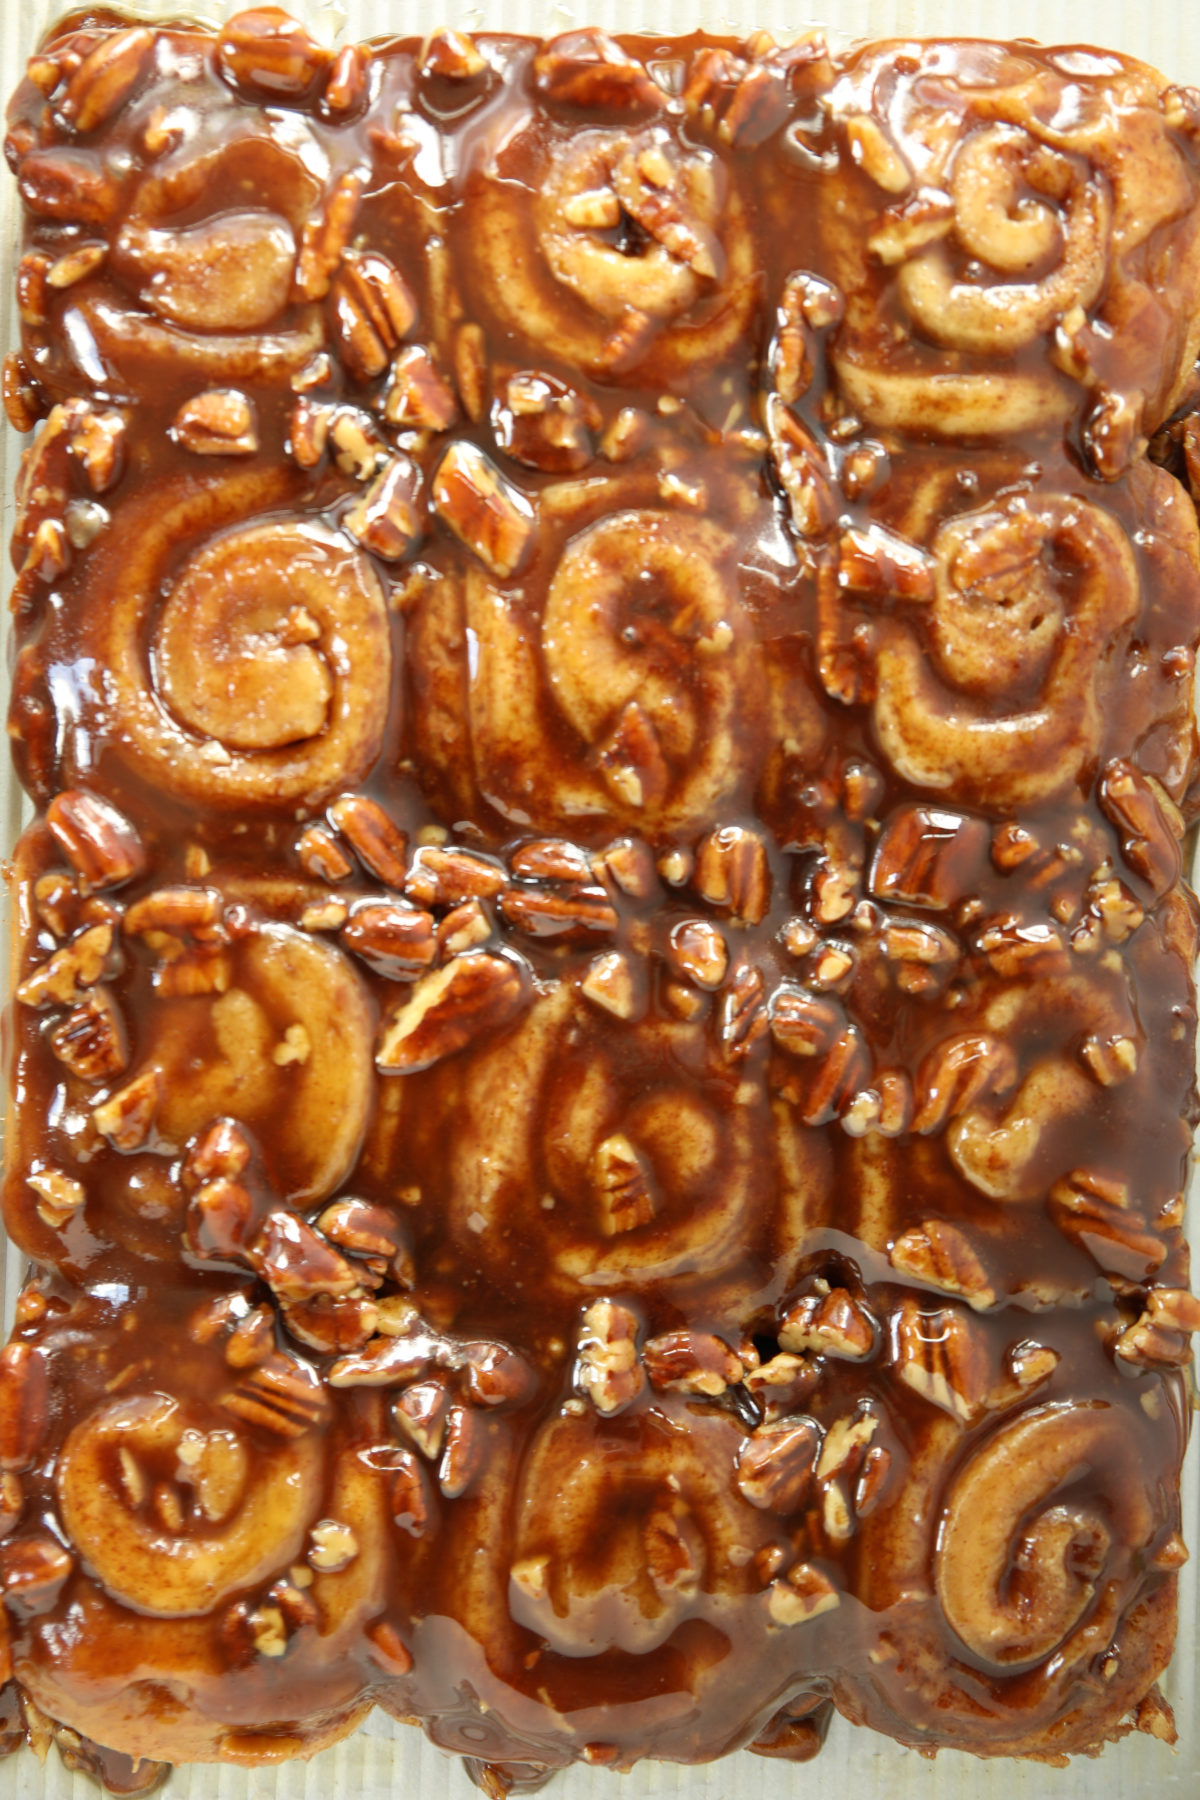
My Sourdough Discard Sticky Buns In Full Glory!
More Cinnamon Roll Recipes You’ll Love
If these cinnamon rolls hit the spot there are a few more recipes worth knowing about:
- Sourdough Cinnamon Rolls — The overnight fermentation builds incredible flavor and that same sticky caramel bottom. If you have a sourdough starter this one is a must.
- Sourdough Discard Sticky Buns with Pecans — Same amazing dough concept with a sticky caramel pecan topping that will make you weak in the knees.
- Sourdough Discard Cinnamon Rolls — A great use for that discard sitting in your fridge and every bit as good as the original.
- No Chill Cinnamon Roll Sugar Cookies — All the flavors of a cinnamon roll in a soft sugar cookie. No chilling required and dangerously easy to make.
- Sticky Bun Breakfast Syrup — Pour this over pancakes or use it as the base for sticky buns with this same dough. Rich, warm with cinnamon, and ready in minutes.
- Texas Roadhouse Rolls — If you love bread machine dough you need these in your life. Soft, slightly sweet, and dangerously good with cinnamon honey butter.
Better than Cinnabon Cinnamon Rolls with Buttercream Glaze
Ingredients
Dough
- 1 1/4 cups water (10oz)
- 1 teaspoon fine grain sea salt
- 4 Tablespoons salted butter
- 4 cups all-purpose flour measured by spoon and level
- ½ cup packed brown sugar
- 1 Tablespoon yeast
Filling
- ½ cup salted butter very soft but not melted
- 1 cup packed brown sugar
- 1 1/2 Tablespoons ground cinnamon
Buttercream Glaze:
- ½ cup salted butter melted (or ½ cup unsalted plus ¼ tsp. salt)
- 2 cups powdered sugar
- 2 Tablespoon milk any fat content
- 1 teaspoon vanilla extract
Instructions
Step 1: Make the Dough (Choose Your Method)
Stand Mixer
- Combine water and butter in a microwave safe bowl and heat 30-60 seconds until pleasantly warm and butter is partially melted. Add to stand mixer.Use the dough hook to stir in brown sugar, salt, and yeast. Slowly add the flour with the dough hook running on low.Knead with a dough hook on medium speed for 5 minutes until smooth, soft, and elastic. Place in a lightly oiled bowl, cover, and let rise in a warm place until doubled — about 60-90 minutes.
Bread Machine
- Add all dough ingredients to your bread machine, set to the dough cycle, and start. Come back when the cycle is done — the machine handles everything.
By Hand
- Combine water and butter in a microwave safe bowl and heat 30-60 seconds until pleasantly warm and butter is partially melted. Whisk in brown sugar, salt, and yeast.Whisk in ½ cup flour, then add remaining 3½ cups and stir until a dough forms.Spray your clean counter and your hands liberally with nonstick cooking spray and knead for 8-10 minutes until smooth, soft, and elastic. Place in a lightly oiled bowl, cover, and let rise in a warm place until doubled — about 60-90 minutes.
Rise In a Warm Place
- For the rise: If your oven has a proofing setting use it! Otherwise preheat to 350°F for ONE MINUTE, turn it OFF, and place covered dough inside. Consistent warmth, consistent results. Remember to remove dough before preheating to bake.
Step 2: Fill and Cut (All Methods Continue Here)
- Lightly spray a 9x13 metal baking pan with nonstick cooking spray and set aside.
- Lightly spray your silicone dough mat or clean counter with nonstick cooking spray or a light mist of neutral cooking oil. Roll dough into a 12" x 18" rectangle.
- Stir very soft butter, brown sugar, and cinnamon together into a thick paste. Spread evenly over the dough with an offset spatula all the way to the edges and three sides leaving a 1/2" strip of plain dough along one long edge - this is where you will seal each roll.
- Using a pizza cutter, cut the filled dough into 12 even strips. Roll each strip up individually and lightly pinch the end into the side of the roll to make a seam. (See post above for the dental floss method and knife/bench scraper method if needed.)
- Set the rolls in greased pan in a 3x4 pattern leaving space between the rolls for them to rise.
- (If you want to do the overnight method see notes at bottom now.)
Step 3: Second Rise
- Set pan in a warm place to rise about 30 minutes until puffy and rolls are just touching. Use your oven proofing setting or the one-minute oven trick. Remember to remove rolls before preheating to bake.
Step 4: Bake
- Preheat oven to 350°F. Remove plastic wrap and bake 25-30 minutes until tops are golden and rolls are cooked through. To check doneness use a fork to gently lift the center layers of a roll in the middle of the pan — no raw dough should be visible.
Step 5: Glaze
- Remove from oven and wait 10-30 minutes before glazing. (10 minutes for maximum soak-in gooeyness, 30 minutes for beautiful visible buttercream swirls on top — both are deeply delicious.)
- Whisk melted butter and powdered sugar together until no lumps remain. Add milk and vanilla and whisk until smooth and pourable. Spoon generously over warm rolls and swirl to cover.
Storage & Reheating
- Cover and store at room temperature up to 3days. Microwave 20-30 seconds to reheat — don't overdo it or you'll end up with shoe leather.
Helpful Recipe Notes
Your Rating Matters
When you leave a comment or star rating, it means more than you might think. It helps me understand what you’re enjoying, builds trust for other readers, and supports real, tested cooking content. If you have a moment, I’d truly appreciate you sharing your experience. - Mirlandra
Nutrition Estimate
A Note on Nutrition
Nutritional info is an imperfect estimate. Please take it with a grain of salt.
PIN FOR LATER
Nicki says
Directions for those that don’t own a bread machine?
Mirlandra says
Hi Nicki – I updated the recipe today with instructions to make the dough without a machine. I hope that helps! If you have any questions let me know! Enjoy 🙂
Becky says
Excellent recipe! Better than Cinnabons!
Mirlandra says
Thank you for telling me! These are a favorite of mine. I’m making a batch this weekend, in fact 🙂 Happy baking and enjoy your Easter!
Caryn says
How did I never think of using the bread machine for cinnamon rolls?! This looks amazing! Question: Is this your base recipe for sticky buns? If so, is there a trick to applying the sauce?
Mirlandra says
It is genius! So much time saved 🙂 I just had my machine out last night to make a big batch of rolls for company. It was so easy. This is my base for sticky buns. With sticky buns you cook the sauce in a pan on the stove and pour it into the baking dish. Then you add the rolls on top of the sauce, let rise and bake until they are done. When they finish baking you get to juggle… This is the tricky bit. I own two pans the same size so I put a clean pan on top and use it to flip the rolls into. Just be careful – hot rolls in sticky sauce…yeah, keep the kids out of the kitchen for this one! You can also invert the pan unto a cookie sheet which does not contain the sauce as well but really works pretty well. I have often gotten the stick bun sauce on my oven mitts doing the flip. I just toss my mitts into the washing machine if they got sticky.
Caryn says
I just wanted to come back and report that the sticky buns I made using this cinnamon roll recipe and your sticky buns sauce recipe worked FABULOUSLY. They are to die for! I have never met a dough so luxurious and happy to be rolled out. I only used half of the sticky bun sauce and thought it was perfect.
Note: When I first put the rolls in the pan, I was laughing because they were SO tall and skinny and spaced so far apart from each other… I was sure I rolled it from the wrong end. Lo and behold, they filled out beautifully and turned out right!
Mirlandra says
I love this!!! I think one of my favorite parts of baking cinnamon rolls is seeing how little they start out and how big they get! It just makes me glad down to my toes. I’m so glad this was a win for you! We enjoyed an nice big pan on Christmas morning and I’m trying to convince myself that really I should make this for New Years breakfast too! It just seems like a lovely way to start the year off.
Rita Holland says
For sticky buns do you have a recipe for your sticky base? And do you then use the regular cinnamon roll recipe with filling to place on top of the cooked sticky base in the pan? Thanks!
Mirlandra says
Hi Rita! Ah yes…. Sticky buns! I have never posted the recipe on here – I should! It is heaven!!! I use these cinnamon rolls as is but put them over a cooked sticky bun sauce in the base of the pan. My sauce recipe is posted because sometimes I use it as pancake syrup! You can grab the recipe here: https://www.mirlandraskitchen.com/sticky-bun-syrup/ Enjoy!
Angela Penfold says
We made these once and loved them! Only problem was they weren’t ready until lunch time! 🙂
Can these be made the night before?
Mirlandra says
Hi Angela – they absolutely can! When I do them the night before I roll them out and shape them and then place in the pan. I immediately cover with plastic wrap and refrigerate up to 24 hours. When I’m ready to bake them I remove them and let them rise 2-3 hours until doubled (it takes longer from the fridge than from fresh) and then bake as directed. They come out perfectly!
Christi says
Hi, thanks for this recipe! Planning on using it for Christmas morning. When letting the rolls rise from the fridge, should it be at room temp? Pardon my ignorance, I’m a beginner baker. 🙂
Thank you!
Mirlandra says
Christi, we all start somewhere! I love that you are a beginning baker and tackling fun new recipes! It won’t be long at all before you are answering baking questions for other people! “Room temp” is a hard thing in baking because different houses are different temperatures. Also it never fails but you leave something to rise on the counter and then somebody comes and opens a kitchen window! I like to turn my oven on to the lowest setting (200 F) and set a time for TWO MINUTES. Then I turn it OFF before putting the rolls to rise in there. This gives a warm place to rise without cooking the rolls. When they are risen take them OUT of the oven BEFORE preheating. This is my “room temp” solution for consistency that helps with all my yeast baking. I hope it is as magical for you as it is for me!
Carlie says
I really don’t like powdered sugar is there an alternative icing?
Mirlandra says
Hi Carlie – I haven’t made an icing without powdered sugar before. But there are certainly options you can try that might fit you well. For one – these rolls are sweet and flavorful. You could just brush some melted butter on when they come out of the oven if you would prefer to skip icing the rolls. Another option is to check this recipe: https://foodsguy.com/cinnamon-roll-icing-without-powdered-sugar/ I have not used it but it seems like an option to experiment. The other thing you could try is to make your own powdered sugar out of maple syrup! My friend Victoria at A Modern Homestead has a recipe for that here. She is great if you are looking for recipes that use less sugar.
Vicki says
Can these be frozen?
Mirlandra says
Hi Vicki – This is a great question! I am not familiar with freezing cinnamon rolls before or after baking. I wish I had better information for you! You could review this article for some more information on freezing before baking: https://www.thekitchn.com/how-to-freeze-cinnamon-rolls-and-bake-them-later-cooking-lessons-from-the-kitchn-198123
LisaK says
Thank you, thank you, and THANK YOU!!!!! These are the best cinnamon rolls I have ever had!
Mirlandra says
Awe, Lisa, you made my day! Thanks for sharing. I’m so glad you enjoyed them! They are on my list for Easter breakfast this year!
Caryn says
I’m back again to share that I tried making 24 instead of 12 for the first time this Easter (not doubling the batch, just slicing the dough in half after spreading the filling to make 24 smaller rolls) and they came out wonderful! Baking time was slightly less, maybe 5 minutes with the smaller size. Perfect for feeding brunch to a crowd!
Mirlandra says
That is so perfect! When you are having an entire brunch a cinnamon roll can just be too big!!! But a half size is super practical. Love it!
Carol Rowe says
Excellent! I added a diced apple. Yummy 😋
Mirlandra says
Oh YUM! I have to do that – it sounds perfect! I just made sourdough cinnamon rolls for the first time and went back to this recipe for the glaze – it is my favorite baking glaze for so many things! Maybe it is the butter makes everything better principle 😉 Happy Baking, Carol!
Miriam says
My whole family loves these. And they seem to be foolproof. I’ve never seen a batch come out dry or mediocre in any way.
Jen says
We can’t wait to make this recipe, but are new to cooking with yeast. Do you use Active Dry Yeast or Instant Yeast?
Mirlandra says
Welcome to new baking adventures! They will both work fine in this recipe!
Kimberly Scheid says
These are amazing! My daughter had a sleep over at a friends house and her mom made cinnamon rolls from a can and my daughter stated my cinnamon rolls are way better. Thanks for giving me recipes that make’s me the coolest mom!
Mirlandra Neuneker says
Cool mom wins are the best! I’m so glad your kids have a special recipe to grow up with. I love when a recipe becomes a part of a family and you know it will live on through the years as your kids grow up and have their own kids. Thank you!