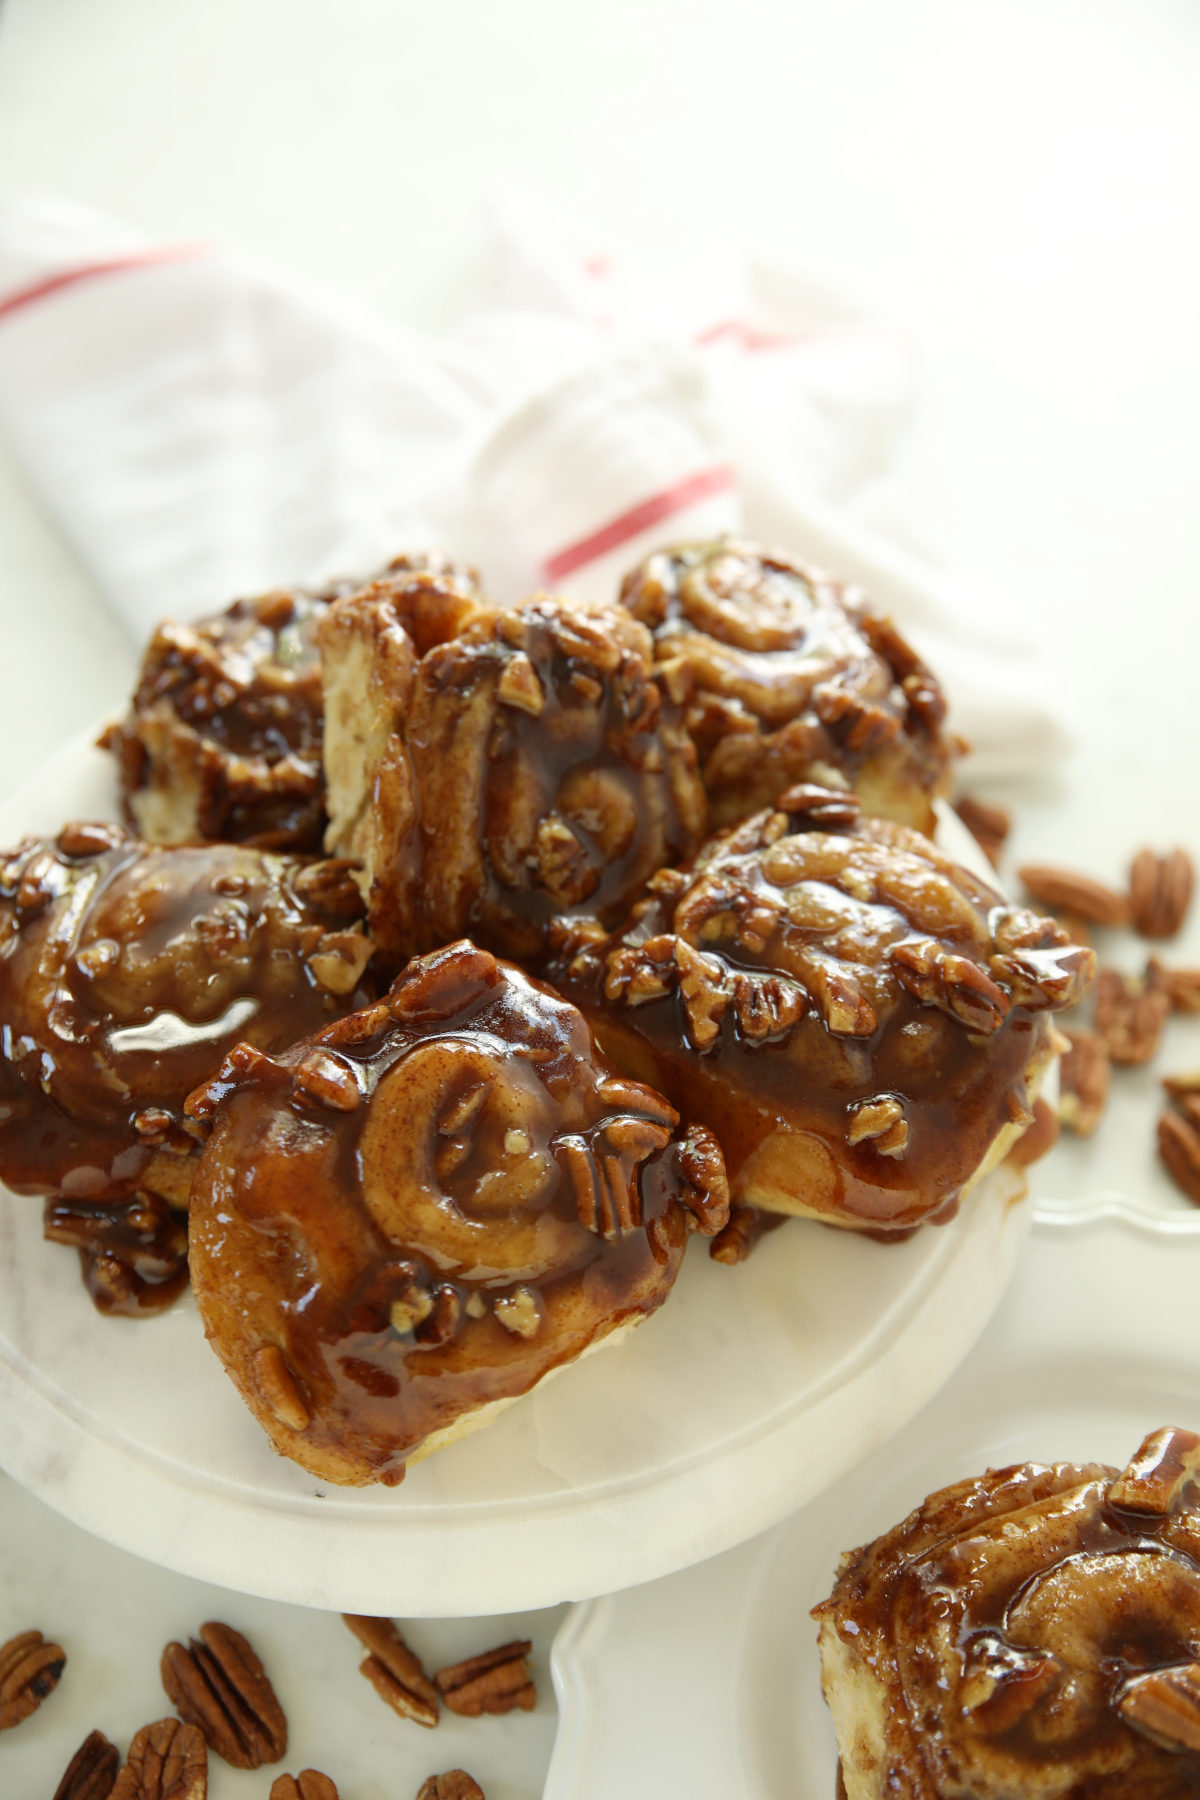
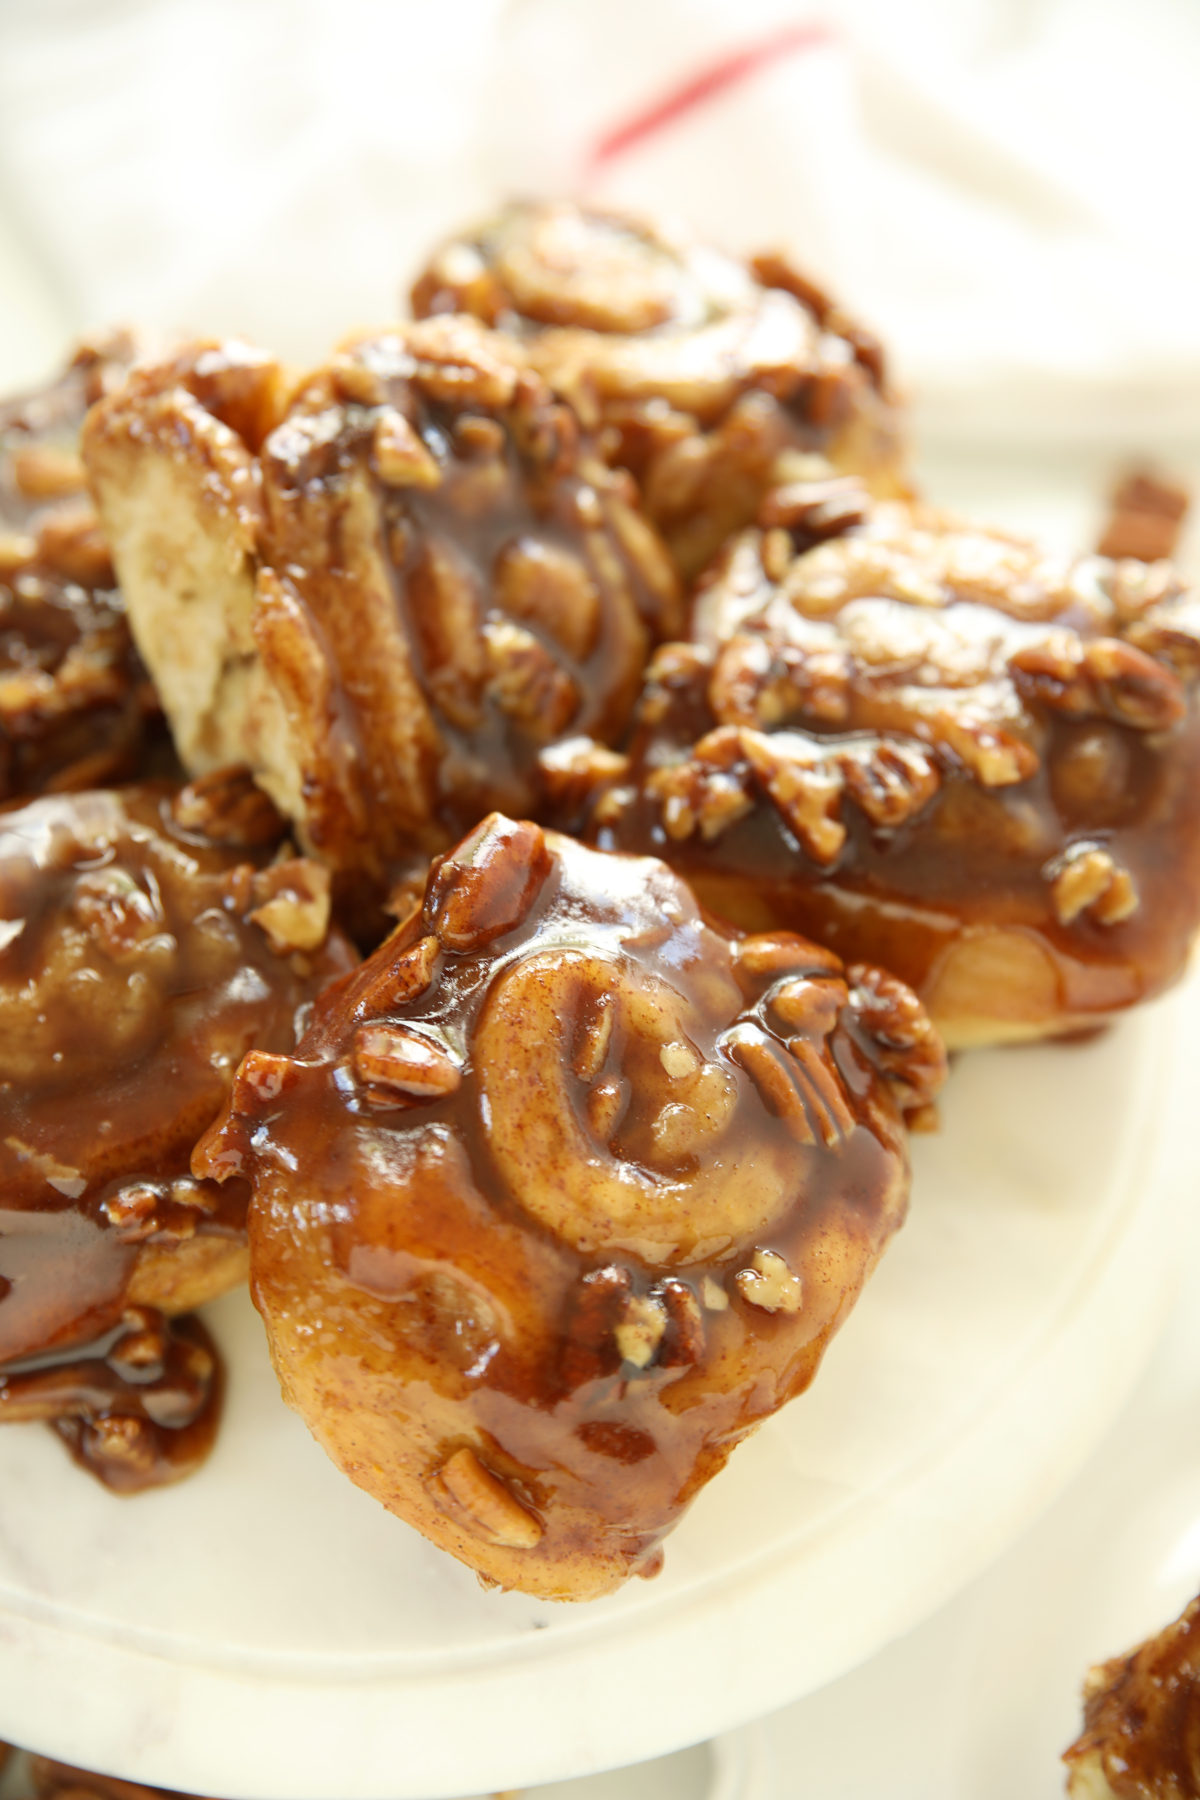
Sticky buns are a special occasion. Not because they’re hard — they’re not. But because pulling that pan off the buns and watching the caramel cascade down is the kind of moment that makes everyone in the kitchen stop what they’re doing. This recipe uses your sourdough discard, a little active dry yeast, and about three hours to get you there.
New to sourdough? Start Here! How To Feed Sourdough Starter Beginners Guide Easy Sourdough Bread Recipe for Beginners (Artisan Loaf)
Sticky buns have a reputation for being fussy. The caramel syrup. The inversion moment. The whole production. Here’s the truth: they’re not actually hard. They just feel impressive. That gap between effort and payoff? That’s my favorite kind of recipe.
This recipe starts with sourdough discard — that unfed starter sitting in your fridge right now. Active dry yeast handles the rise. The discard adds flavor. No feeding required. No timing gymnastics. Just really, really good sticky buns.
Love Cinnamon Rolls? I also have a Soft and Fluffy Sourdough Cinnamon Rolls recipe made with active starter, and yeasted option for Better Than Cinnabon Yeasted Cinnamon Rolls. I think I might have a cinnamon roll problem!
Why This Sourdough Discard Sticky Bun Recipe Works
- That discard tang. The sourdough discard adds a subtle, complex depth that you simply can’t get from a straight yeast dough. It doesn’t make these sour — it makes them interesting and rich in a way that’s hard to put your finger on. (Unless you use crazy old discard with hooch on it – then you have a situation…)
- Reliable rise every time. Because this is a yeasted discard recipe — not a wild ferment — the active dry yeast does the work. Your discard adds flavor without introducing any unpredictability. If you are new to sourdough this is a great place to start! You can glow up into the Sourdough Cinnamon Rolls when you are ready 😉
- The syrup is the whole show. That brown sugar and butter syrup sauce bakes under the rolls and becomes a glossy, gooey caramel that coats every bun when you flip them. It is deeply, dangerously good. I actually make it just as Sticky Bun Syrup for our pancakes. You can’t not love it!
- Pecans are optional! Everybody has a preference and it won’t impact the recipe to leave them out.
- The inversion is easier than you think. The “flip the pan” moment sounds scary. It is not. I’ll walk you through it and you’ll wonder what you were worried about.
Timing at a Glance
This is a same-day recipe with a short, yeasted rise — no overnight ferment required, though there is an overnight option in the notes if you’d like to adjust your timing! This is extra helpful for Christmas Morning (hint, hint…)
- Make the dough: 10 minutes
- First rise: 60–90 minutes (until doubled) – warmth will impact this timeline a TON
- Shape and cut: 20 minutes
- Second rise: 30 minutes
- Bake: 25–30 minutes
- Cool before inverting: 25–30 minutes
Classic weekend morning schedule: Mix dough at 8am → first rise done by 9:30am → shape and assemble by 10am → bake by 10:30am → on the table by 11:15am. Fresh sticky buns before lunch. (Translation fresh sticky buns FOR lunch. Really just call it brunch and then anything goes!)
What Is a Yeasted Discard Recipe?
A traditional sourdough recipe uses only wild yeast from an active, recently fed starter to leaven the dough. It’s wonderful but you have to plan ahead and leave time for fermentation.
A yeasted discard recipe uses unfed sourdough discard purely for flavor while active dry yeast handles the rise. You get the tangy, complex taste of sourdough without any of the timing gymnastics. It’s one of my favorite tricks and it’s what makes this recipe so practical for a real weekend morning.
The discard: Ideally your discard would be brought up to room temp before you start. Cold discard straight from the fridge can slow your yeast down a lot. But you don’t have to feed starter and wait for it to become active and ready!
The more mature your discard (a week or two old), the more tang you’ll taste in the final buns. I would caution you to avoid discard that’s so old it has hooch on top. That will be a kind of sour you don’t want to mess with!
AP Flour vs. Bread Flour: Use the Right One
Bread flour runs 12–14% protein. All-purpose sits around 10–11.5%. More protein means more gluten — great for a crusty sourdough loaf, but in a sticky bun it creates a chewier, tougher texture that cools down bready instead of pillowy.
Sticky bun dough is an enriched dough, loaded with butter and brown sugar. Fat naturally inhibits gluten development, doing part of the tenderizing work for you. Bread flour fights against that. All-purpose works with it.
The bottom line: Use all-purpose flour. This is non-negotiable for the texture you want.
A note on measuring: This recipe is written in grams for a reason. A cup of flour can vary by 20–30% depending on how it’s scooped. Grams are precise, and precise flour measurement is the difference between a sticky bun that’s pillowy and one that’s dense. I’ve included approximate cup measurements just to help you make sure you have enough ingredients.
The Sticky Bun Syrup: The Most Important Step
This is what makes a sticky bun a sticky bun — and it deserves its own section.
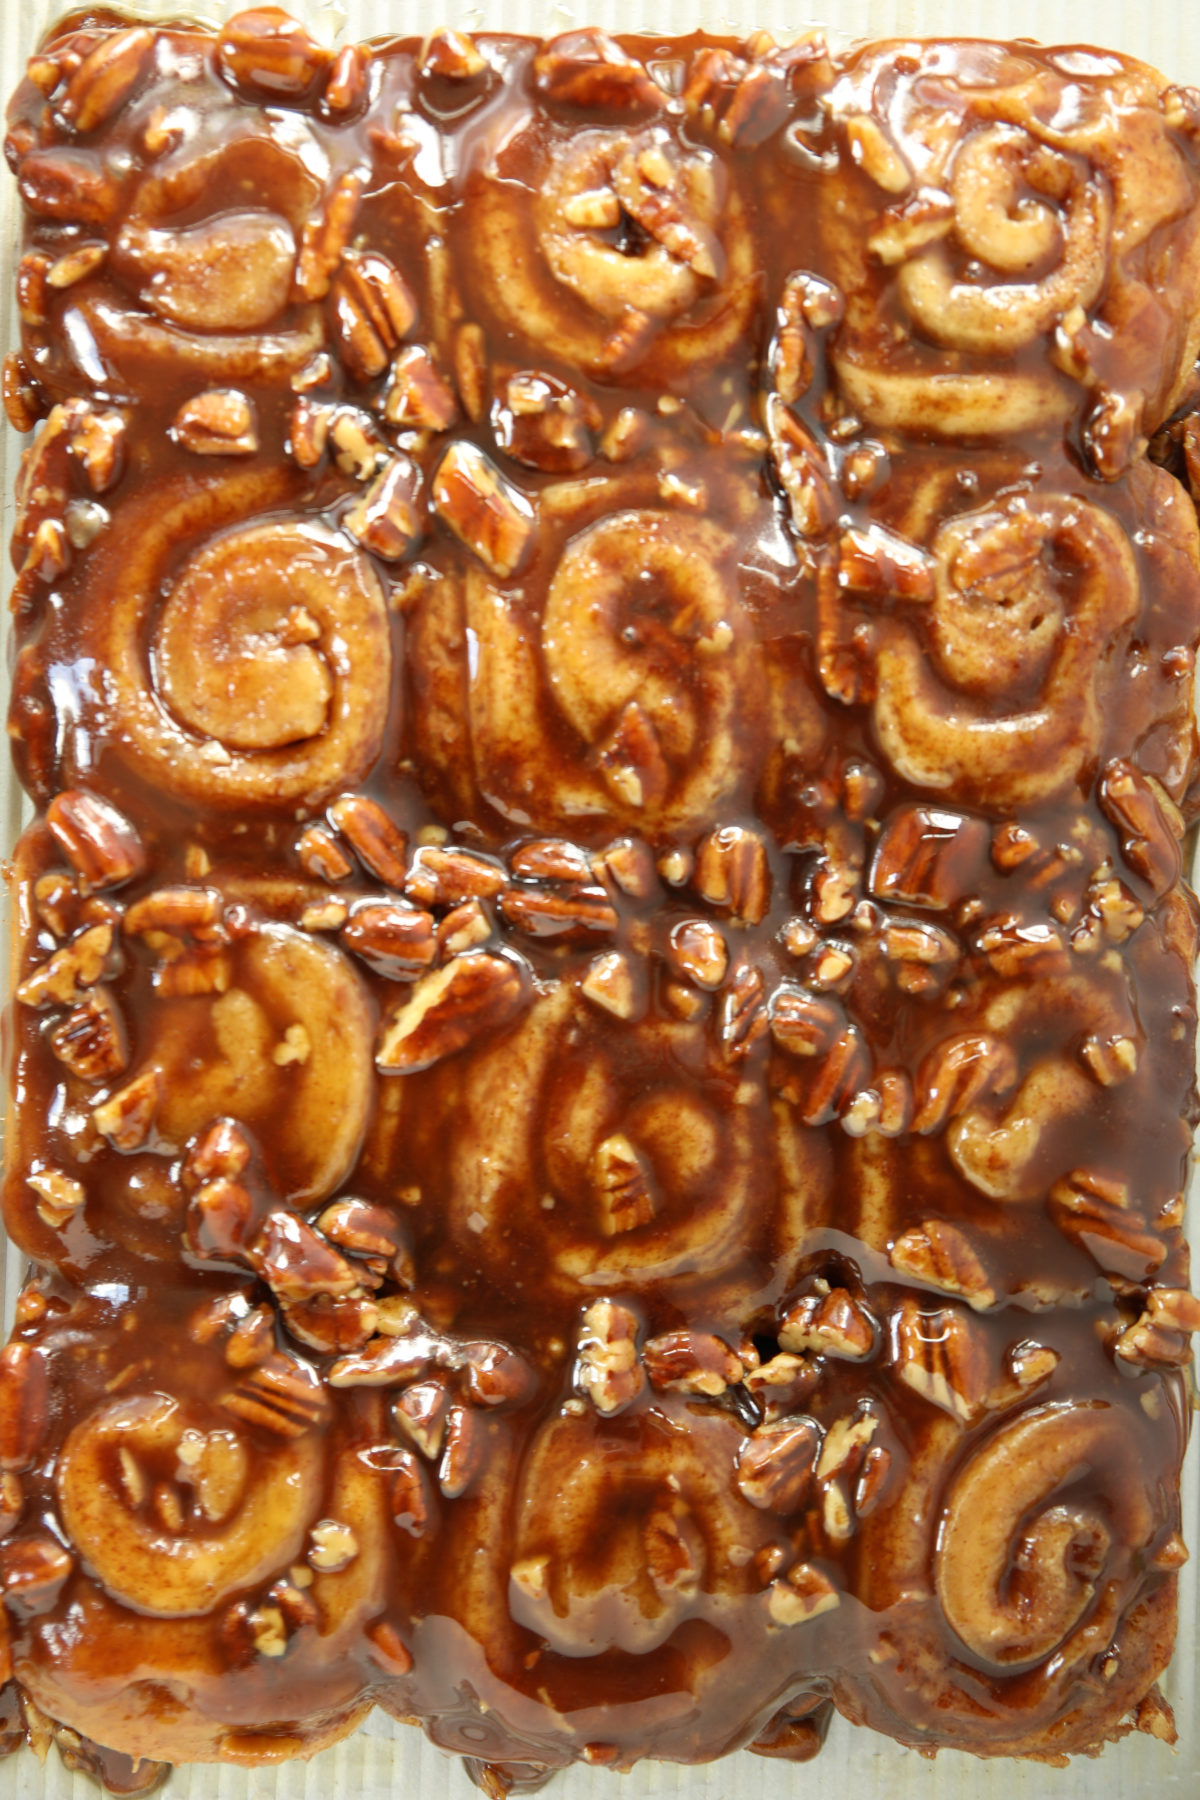
The syrup goes into the pan before the rolls. Brown sugar, corn syrup, butter, and cinnamon get cooked to a boil. The pecans get stirred and and then all the syrup gets poured straight into your 9″×12″ metal pan and smoothed into the corners. The rolls go on top.
During baking, the rolls absorb some of the syrup from below while the rest caramelizes around and under them. When you invert the pan after cooling, that entire sticky, glistening layer becomes the top of the buns.
A few things that matter here:
- Metal pan only. A good quality metal pan makes for a solid, even bake without any of the uneven issues of glass!
- Work quickly with the syrup. Once it comes off the heat it starts to set. Pour it into the pan and smooth it into the corners immediately — don’t walk away to check your phone.
- Golden syrup is an excellent substitute for corn syrup. It has a slightly more complex, less sweet flavor that is genuinely wonderful in this recipe. British golden syrup (Lyle’s) works perfectly. It can be found in the International section of some grocery stores or ordered online.
The Filling Mistake That Ruins Sticky Buns
Same rule as cinnamon rolls: very soft butter, not melted.
The filling is butter, brown sugar, and cinnamon stirred into a thick, spreadable paste. M
elted butter is liquid — it runs when you roll the dough, causes the layers to slip, and pools at the bottom of the rolls instead of staying layered throughout. Soft butter holds its place, keeps the filling where you spread it, and gives you those beautiful distinct swirls in every bun.
Soft butter = beautiful layers. Melted butter = filling soup. Don’t let your butter get away from you.
Tools That Make Sourdough Discard Sticky Buns Easier
- Stand mixer — The dough comes together in about ten minutes of hands-off kneading. Worth every penny on sticky bun day. (Not sure which mixer is right for you? Check out my Bosch vs. KitchenAid breakdown.)
- Dough mat — A lightly sprayed silicone dough mat with measurement guides makes hitting that 12″×18″ rectangle easy and keeps cleanup painless.
- Offset spatula — The best tool for spreading filling evenly to the edges without tearing the dough.
- Pizza cutter — Essential for the strip-cutting method (see below). A rolling blade means zero downward pressure.
- 9″×12″ metal baking pan — The best cinnamon rolls and sticky buns are baked in a meatal baking pan and not a glass casserole dish. Heavy gauge preferred – I’m using one from USA Pans and I love it.
- Second pan or large cookie sheet — You’ll need something to invert the sticky buns onto. A rimmed baking sheet works perfectly. I have four of these cookie sheets from USA pans now because they hold up so well and bake perfect cookies every time!
How to Make Sourdough Discard Sticky Buns
The Dough
The dough comes together quickly in a stand mixer. Add discard, warm water, yeast, melted butter, brown sugar, and salt, mix until combined, then add flour and knead for about 5 minutes until the dough is smooth and satiny — like soft play-dough. That texture tells you the gluten is developed and the buns are going to bake up pillowy.
Cover the dough and let it rise in a warm spot until doubled, about 60–90 minutes. I love using my oven set to proofing mode (around 90–95°F) — warmth speeds things up predictably without overdoing it.
The Syrup and Filling
While the dough finishes its first rise, make the syrup and filling so everything is ready to go when the dough is ready. The syrup takes about 5 minutes to come to a boil — work confidently and move quickly once it does.
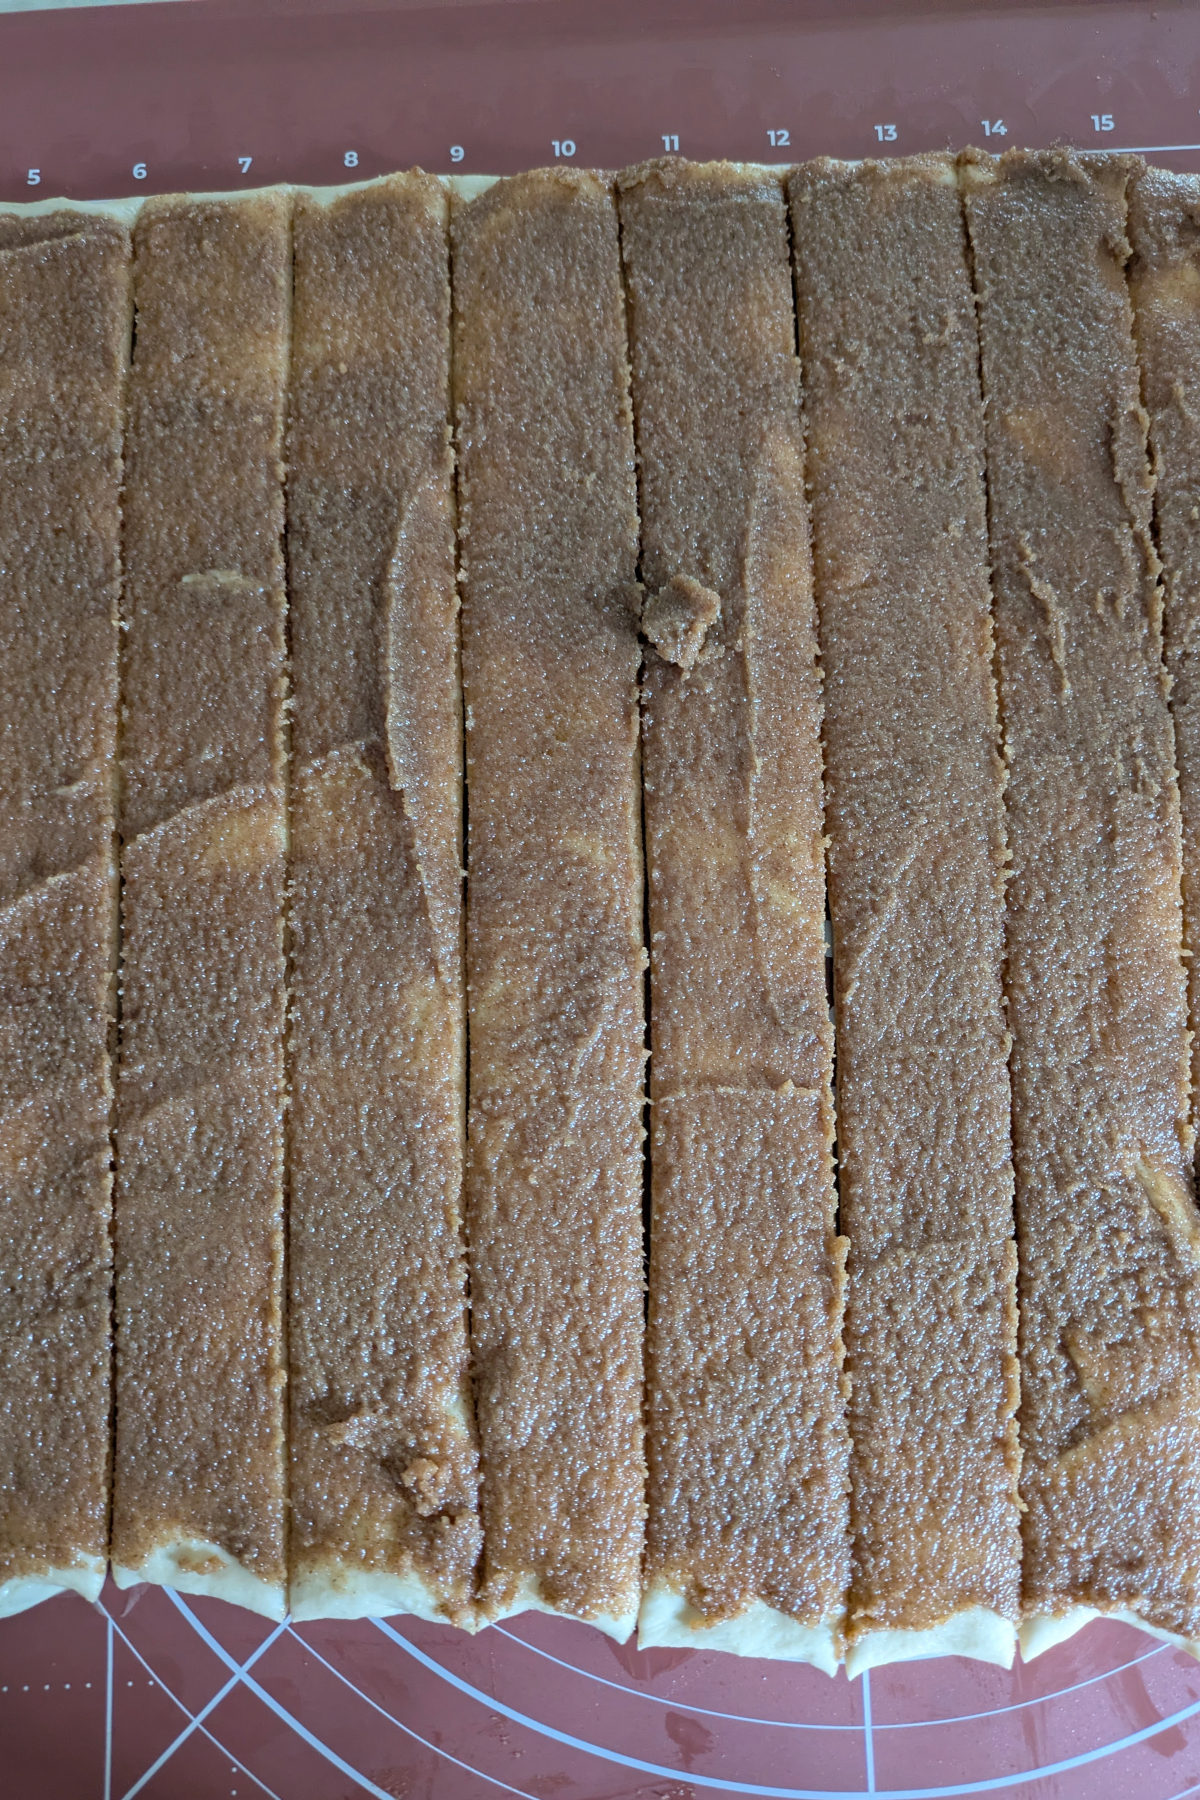
Shaping: The Strip Method
This is my favorite part — and the method that makes sticky buns genuinely easy.
Instead of rolling the filled dough into a giant log and then slicing (which is fussy and often squishes the filling), I spread the filling across the rolled-out rectangle and use a pizza cutter to slice it directly into strips. Each strip gets rolled up individually into its own bun.
The rolling blade glides through without any downward pressure, the filling stays where you put it, and honestly — rolling individual strips is easier and more satisfying than wrestling a log.
The strips go into the pan on top of the syrup, spaced evenly in a 3×4 pattern. Cover and let rise 30 minutes while you preheat the oven.
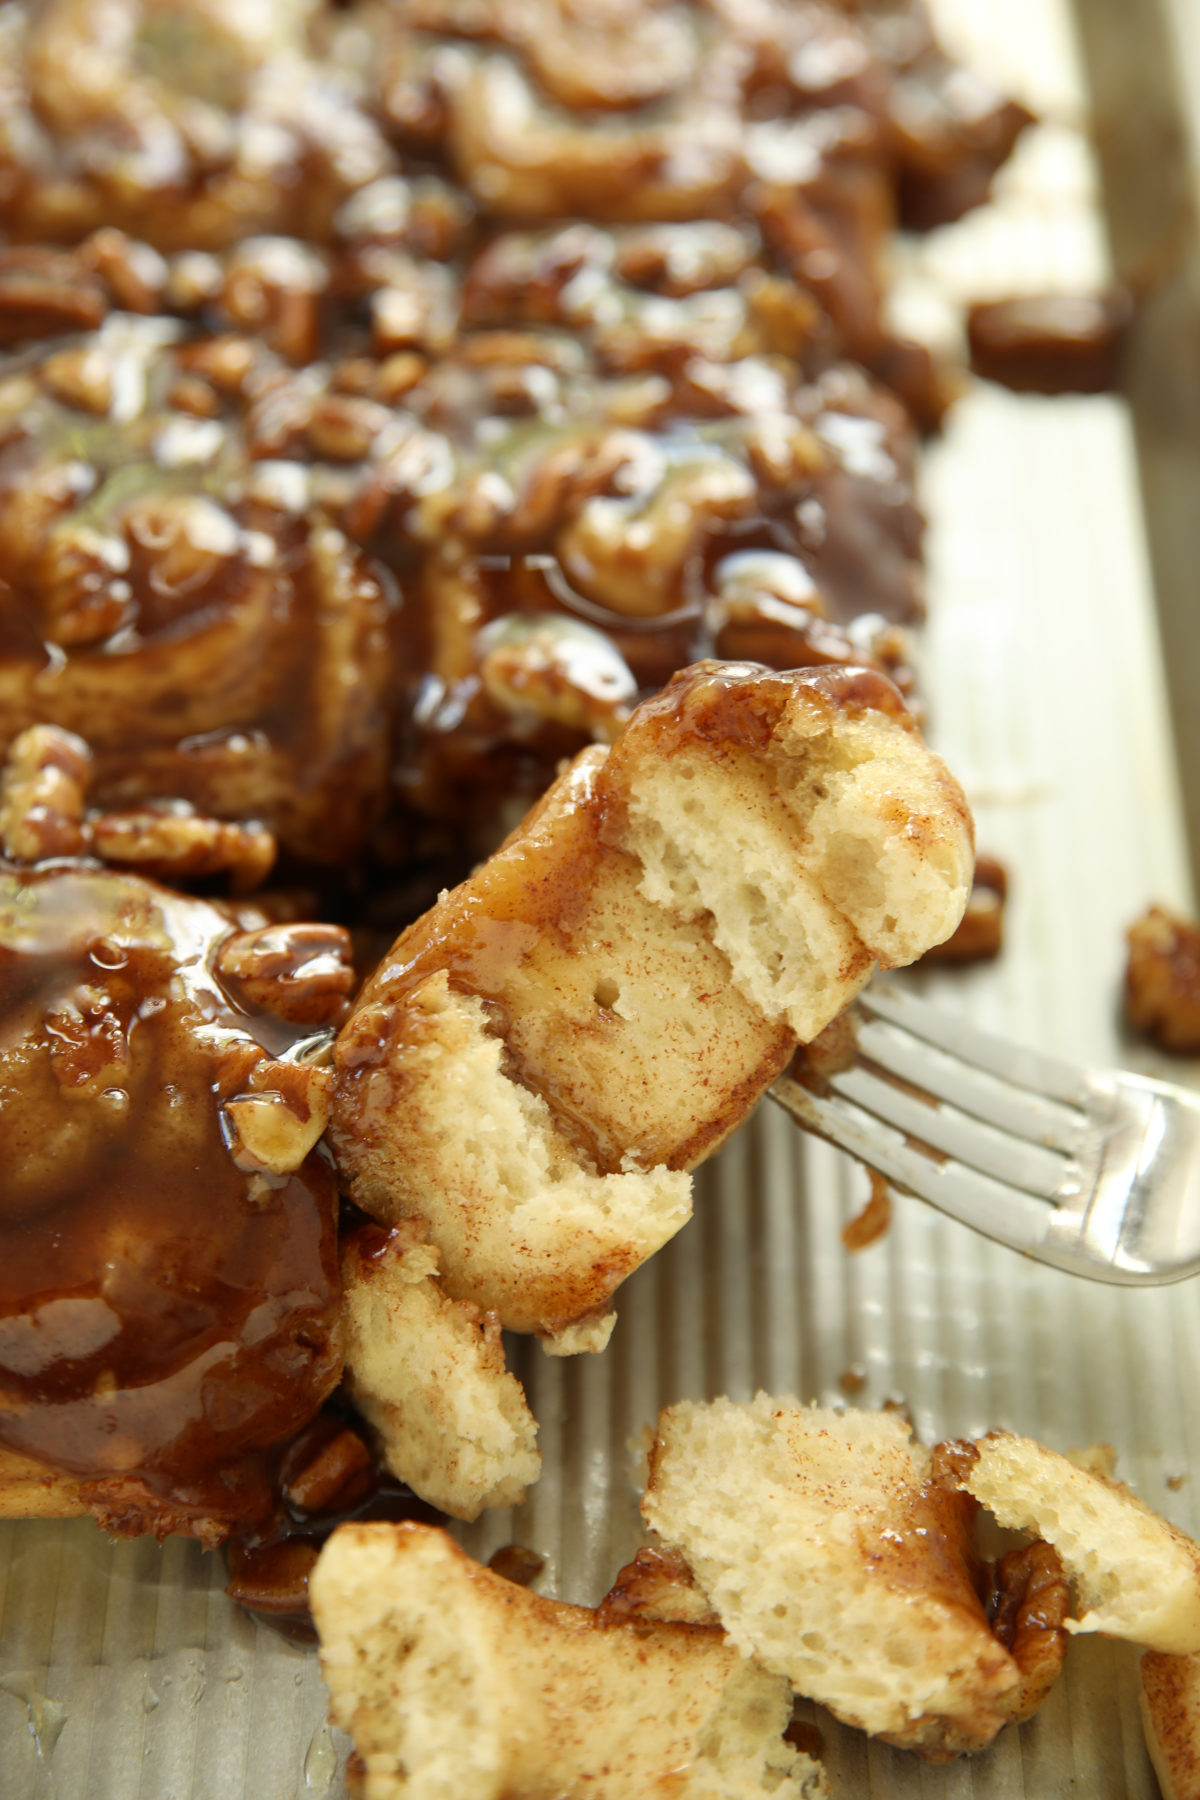
The Inversion: The Most Dramatic Moment in Baking
This is the step everyone is nervous about. Here’s everything you need to know to nail it.
After baking, let the pan cool for 25–30 minutes. Do not skip this. The syrup is molten when it comes out of the oven and it needs time to thicken slightly and for the rolls to set. Too hot and the syrup runs everywhere. Too cool (over 45 minutes or so) and it starts to stick hard to the pan.
When the time is right, place your cookie sheet or second pan directly on top of the sticky buns pan, face down. Hold both pans firmly — a kitchen towel over each hand helps — and flip in one confident motion. Set down, pause for drama, then lift the baking pan straight up.
The syrup cascades down over the buns. The pecans are now on top. It looks like a bakery case. You did that.
Important: Do this with a rimmed pan — the syrup is messy and wonderful. Any syrup left in the pan can be scraped over the top of the buns.
Serving and Storage
Sourdough discard sticky buns are best eaten warm, the same day they’re made. Serve with coffee, with milk, with nothing at all. They need no accompaniment.
Store leftovers in a sealed container at room temperature for up to 3 days. Rewarm individual buns in the microwave for about 30 seconds — the syrup loosens back up beautifully.
Overnight option: After shaping the rolls and placing them on the syrup in the pan, cover and refrigerate overnight. Pull them out 30–60 minutes before baking to come to room temperature, then bake as directed. This is a great option if you want fresh sticky buns for a holiday morning without the full same-day timeline.
Mirlandra’s Tips for Success
- Room temperature discard. Cold discard from the fridge will slow the yeast down. Let it sit on the counter to warm up before you start or plan for a longer time for the yeast to activate.
- Metal pan — always. This is the most repeated note in this post for a reason. The syrup, the bake, and the inversion all work better in metal.
- Don’t rush the cool. 25–30 minutes before inverting is the window. Set a timer.
- Work fast with the syrup. Have your pan ready before the syrup comes to a boil. Once it’s off the heat, you have about 60–90 seconds before it starts setting.
- Trust the dough. The first rise is done when the dough has doubled and looks puffy, not when the clock says so. A warm kitchen moves faster; a cool one takes longer.
More Sourdough Recipes You’ll Love
Sourdough Discard Sticky Buns with Pecans
Ingredients
The Dough
- 500 g sourdough discard unfed — about 2 cups (room temperature; see note)
- 56 g warm water, about 110°F
- 1 Tablespoon active dry yeast
- 4 Tablespoons salted butter melted
- ½ cup light brown sugar packed
- 1 teaspoon fine grain sea salt
- 365 g all-purpose flour about 3 cups (see note on measuring)
The Sticky Bun Syrup
- 1 cup brown sugar packed
- ½ cup corn syrup golden syrup is a wonderful substitute
- ½ cup salted butter
- 1 Tablespoon ground cinnamon
- 1 cup pecans roughly chopped (optional)
The Roll Filling
- ½ cup salted butter very soft but not melted
- 1 cup light brown sugar packed
- 1½ Tablespoons ground cinnamon
Instructions
Mix the Dough
- Add the discard, warm water, yeast, melted butter, brown sugar, and salt to the bowl of a stand mixer fitted with the dough hook. Mix on low until combined.
- Add the flour and mix in on low. Increase to medium and knead for about 5 minutes until the dough is smooth, soft, and satiny — like play-dough.
- Form the dough into a ball and place in a lightly greased bowl. Cover with plastic wrap and set in a warm place until doubled, about 60–90 minutes. (Proofing setting in your oven at 90–95°F works great.) If your warm spot is on the cool side it will take longer for the rolls to rise.
Make the Syrup
- When the dough is nearly doubled, make the syrup. In a medium saucepan, combine the brown sugar, corn syrup, butter, and cinnamon. Whisk over medium heat until the mixture comes to a full boil. It will be thick and glossy.
- Stir in the pecans, if using. Then immediately scrape all of the syrup into a 9"×12" metal baking pan and spread it quickly into the corners — it sets fast. Set the pan next to where you'll be rolling the dough.
Make the Filling
- In a medium bowl, stir together the very soft butter, brown sugar, and cinnamon into a thick paste. Set aside.
Shape the Sticky Buns
- Lightly spray your counter or dough mat with nonstick cooking spray.
- Roll the dough out into a 12″×18″ rectangle.
- Use an offset spatula to spread the filling evenly across the dough, leaving a ½” gap along one of the 18″ edges.
- Use a pizza cutter to slice the dough into 12 even strips (each about 1½” wide), cutting from the filled edge toward the bare edge.
- Roll each strip up individually into a bun, sealing the bare edge against the dough. Place the rolls in the syrup-coated pan in a 3×4 pattern, spacing them evenly.
- Cover the pan with plastic wrap and set in a warm place to rise for 30 minutes. (After 20 minutes you can preheat the oven, giving the rolls a few more minutes of rise while it heats.)
Bake
- Preheat the oven to 350°F. Remove the plastic wrap from the rolls.
- Bake for 25–30 minutes until the tops are golden brown and the dough is cooked through. To check doneness, use a fork to gently lift the center layers of a roll in the middle of the pan — no raw dough should be visible. If it looks gooey, bake 5 more minutes.
Cool and Invert
- Let the pan cool for 25–30 minutes. Do not skip this — the syrup needs time to set up.
- Place a rimmed baking sheet or large cookie sheet face-down on top of the sticky bun pan. Hold both firmly (use kitchen towels — the pan will still be warm) and flip in one confident motion. Set down, then lift the baking pan straight up.
- Any syrup left in the pan can be scraped over the top. Serve warm.
Helpful Recipe Notes
Your Rating Matters
When you leave a comment or star rating, it means more than you might think. It helps me understand what you’re enjoying, builds trust for other readers, and supports real, tested cooking content. If you have a moment, I’d truly appreciate you sharing your experience. – Mirlandra
Nutrition Estimate
A Note on Nutrition
Nutritional info is an imperfect estimate. Please take it with a grain of salt.
New to sourdough? Start Here! How To Feed Sourdough Starter Beginners Guide Easy Sourdough Bread Recipe for Beginners (Artisan Loaf)
Leave a Reply